How to Make a Gantt Chart in Microsoft Project
February 14, 2022 / Estimated reading time: 8 minutes
A Gantt chart is a well-known bar chart and an excellent project management tool used to work with tasks, develop project plans, schedule, and track progress.
This chart gives you a clear visual image in a single document of all the tasks in the project, their sequence on a timeline, milestones, their start and end dates, deadlines, and a general overview of how the project evolves. Everyone throughout the project can easily understand where the team is, what has been done so far, what is still pending, and what is the status of project completion.
Nowadays there are a lot of project management software solutions that allow you to create Gantt charts and work on your projects with their help. MS Project is one of them.
So, let’s have a look in this article at:
- How to create a Gantt chart in Microsoft Project
- Microsoft Project Gantt chart template & example
- How to share MS Project and export your Microsoft Project Gantt Chart
- Printing Microsoft Project Gantt Chart
- How to create and work with Gantt charts more effectively and faster
If you want to learn some other tips on how to perform certain tasks in MS Project, you can check our general Microsoft Project Tutorial. What concerns other ways to build a diagram, you can figure out how to create a Gantt chart in Excel, PowerPoint, and even Word as well.
How to create a Gantt chart in Microsoft Project
To create a Microsoft Project Gantt chart, you have to prepare a list of tasks that will be shown afterward on your Gantt chart. It is recommended to list the tasks in the order they have to be carried out so that your project stays organized and easy to understand.
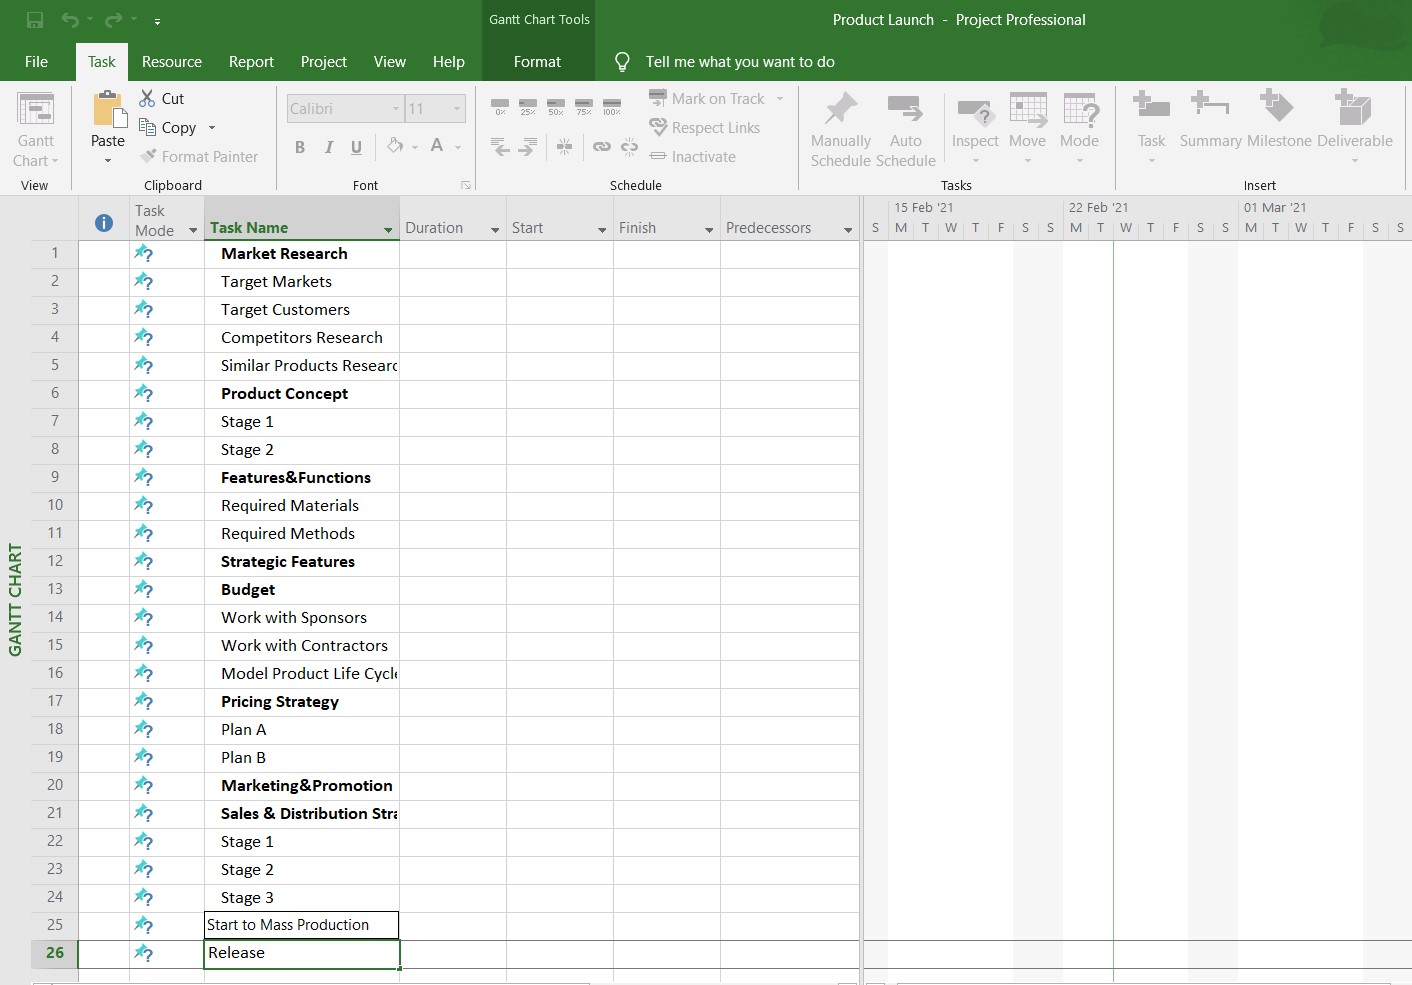
Now that I have my list of tasks, I open a blank project and add all these tasks to my project. To do that you have to copy and paste them or click in the task name field and type in the name of each task. At this point, you won’t see the Gantt chart on the right, since we haven’t defined start and end dates for the tasks yet.
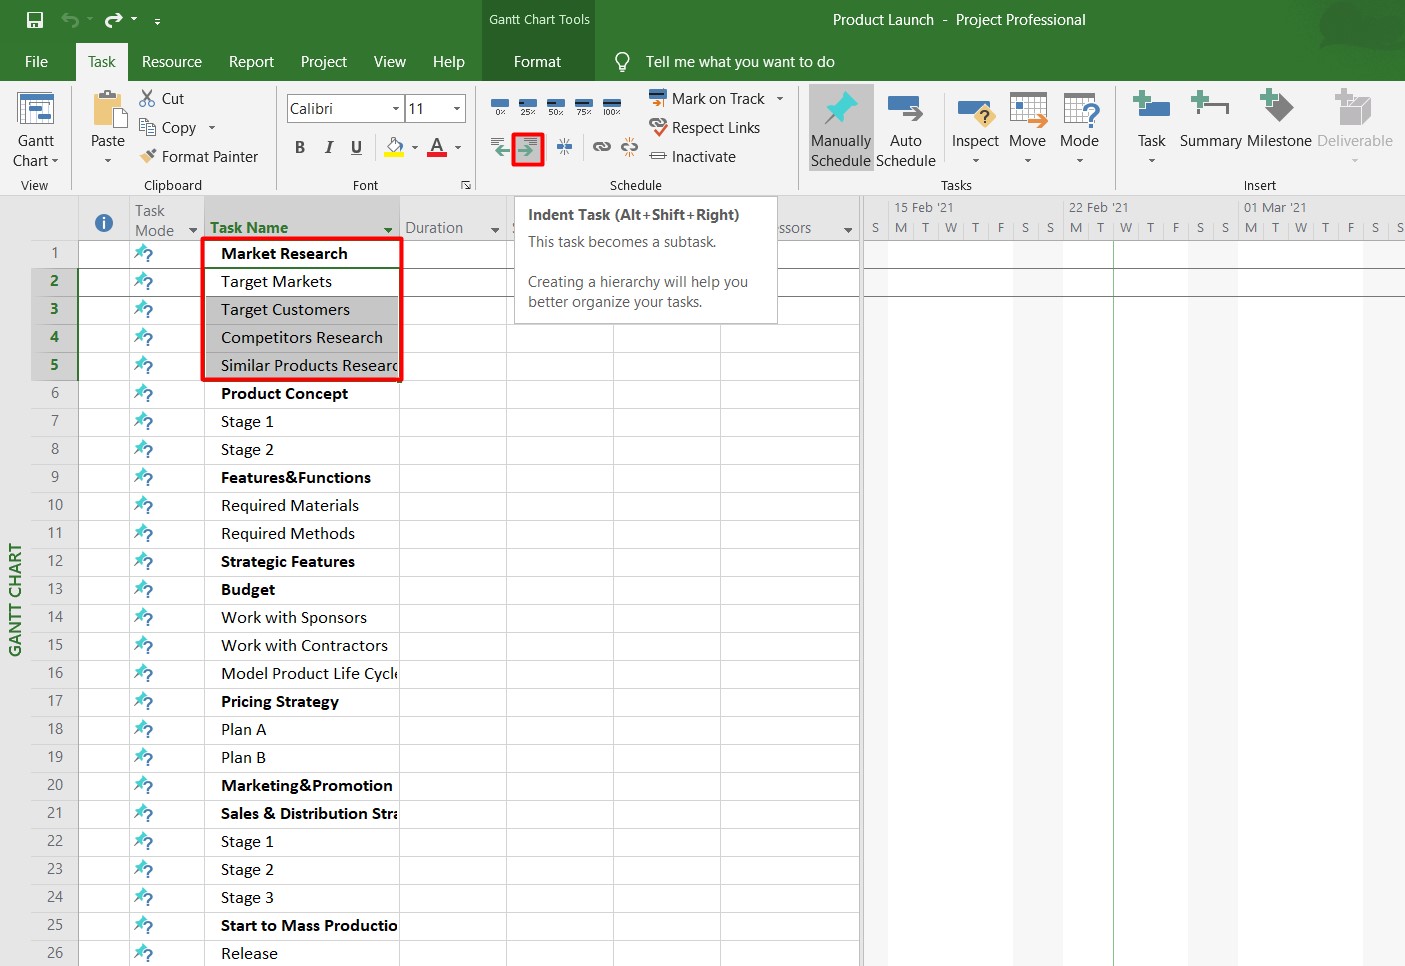
Also, if you have tasks that are related to each other, you can group them as subtasks. This may be helpful for larger projects since they allow you to collapse sections of your project to save some screen space and make the list of tasks easier to look through. Just highlight the task rows that are related and click the right indent button in the ribbon. This will turn the highlighted tasks into subtasks of the item.
Now that we have all our tasks entered into the list and organized as subtasks, let’s define their start and end dates, so we can start to build the actual project schedule.
Click in the start date field and use the date picker to select the start date for the task. You can also do it manually and enter the date by yourself.
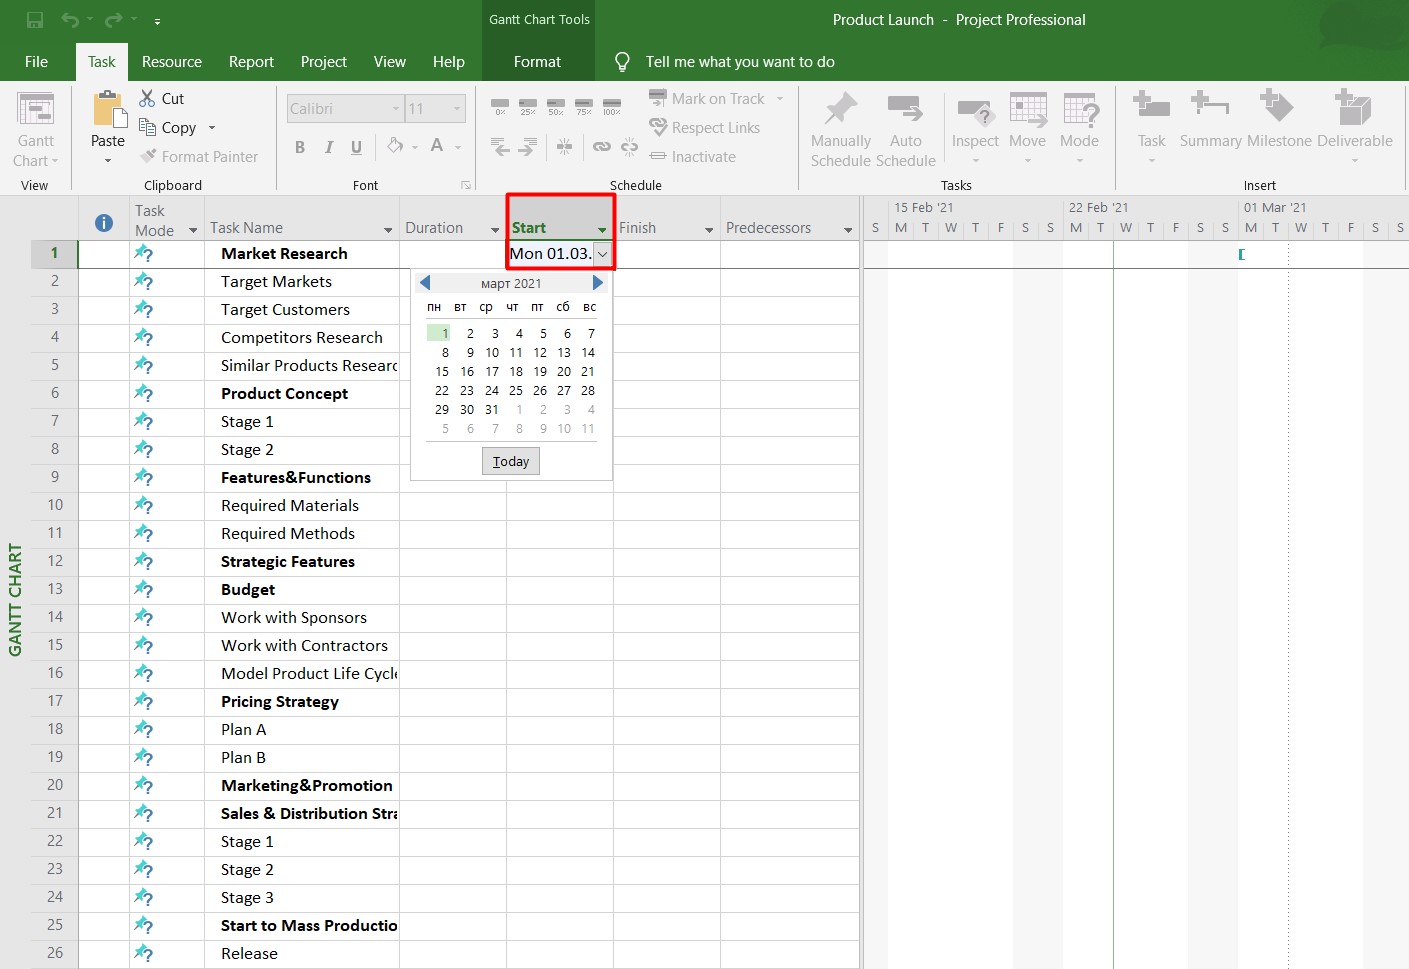
Do the same for the end date. Click in the end date field and use the date picker or enter the date manually. If you prefer, you can just enter a duration into the duration field and MS Project will automatically calculate the end date for you.
Once all the tasks have start and end dates, it’s a good time to add milestones to the project. Milestones may help you to make sure that your project is running just on time and indicate the end of specific phases of the project.
There are several ways to add milestones to the project.
a. Enter a duration of zero days for a task that is already on the list. MS Project will automatically convert this task into a milestone.
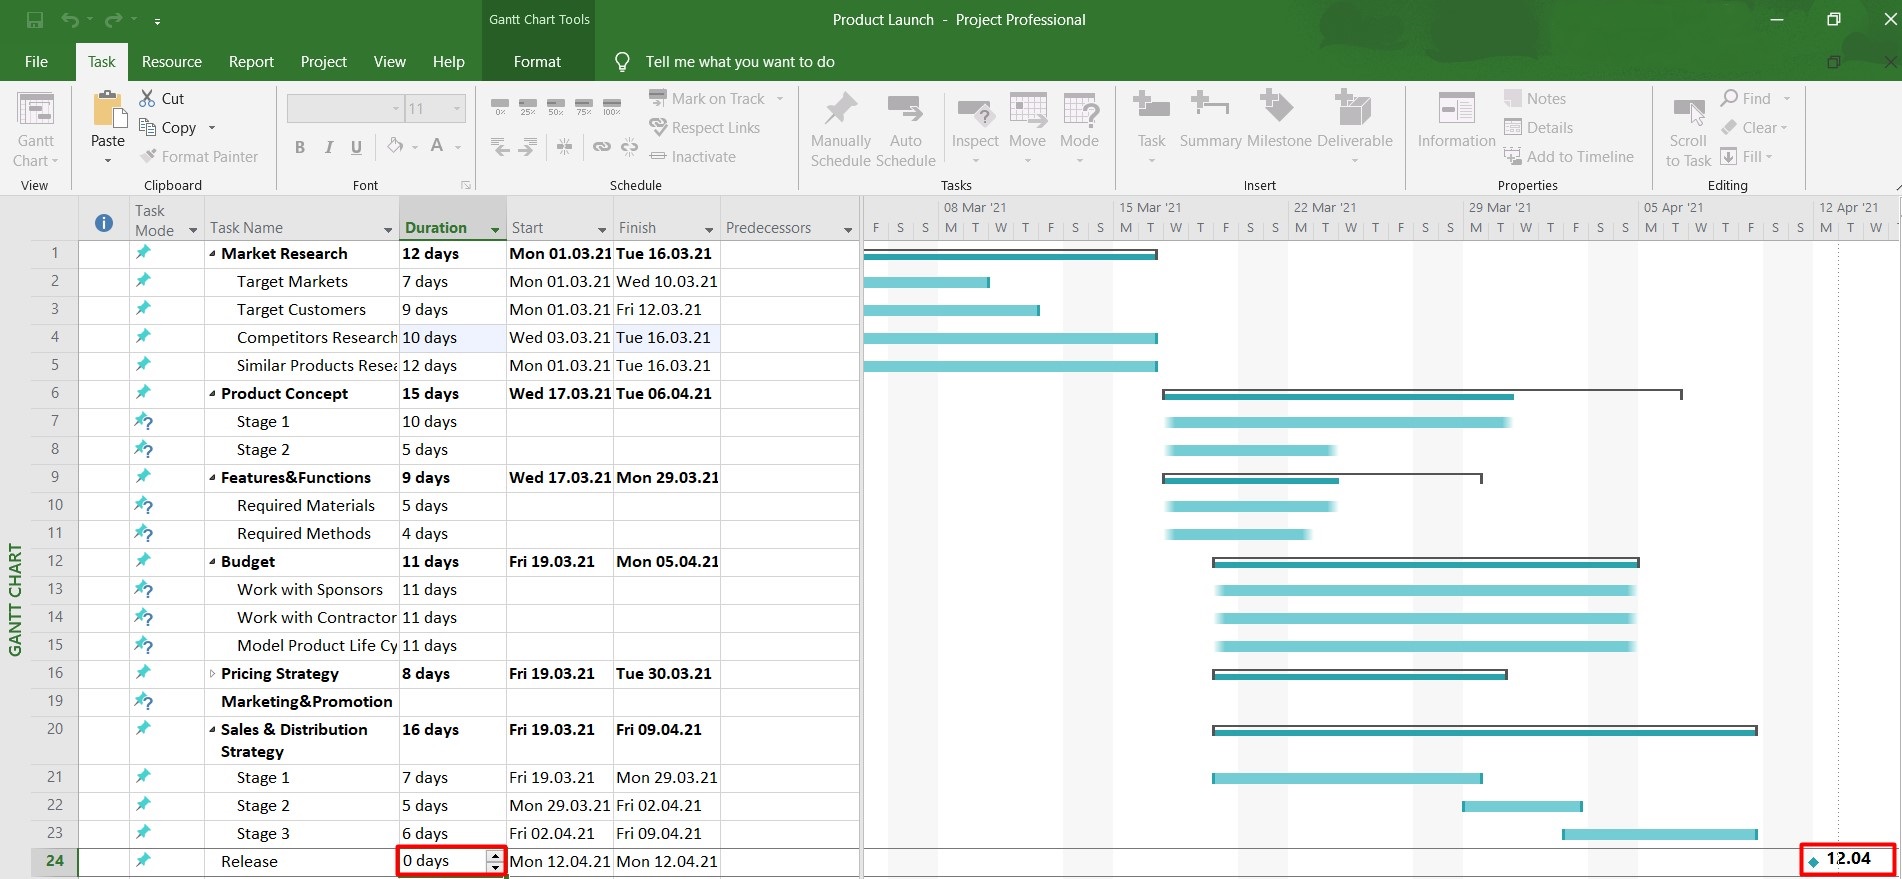
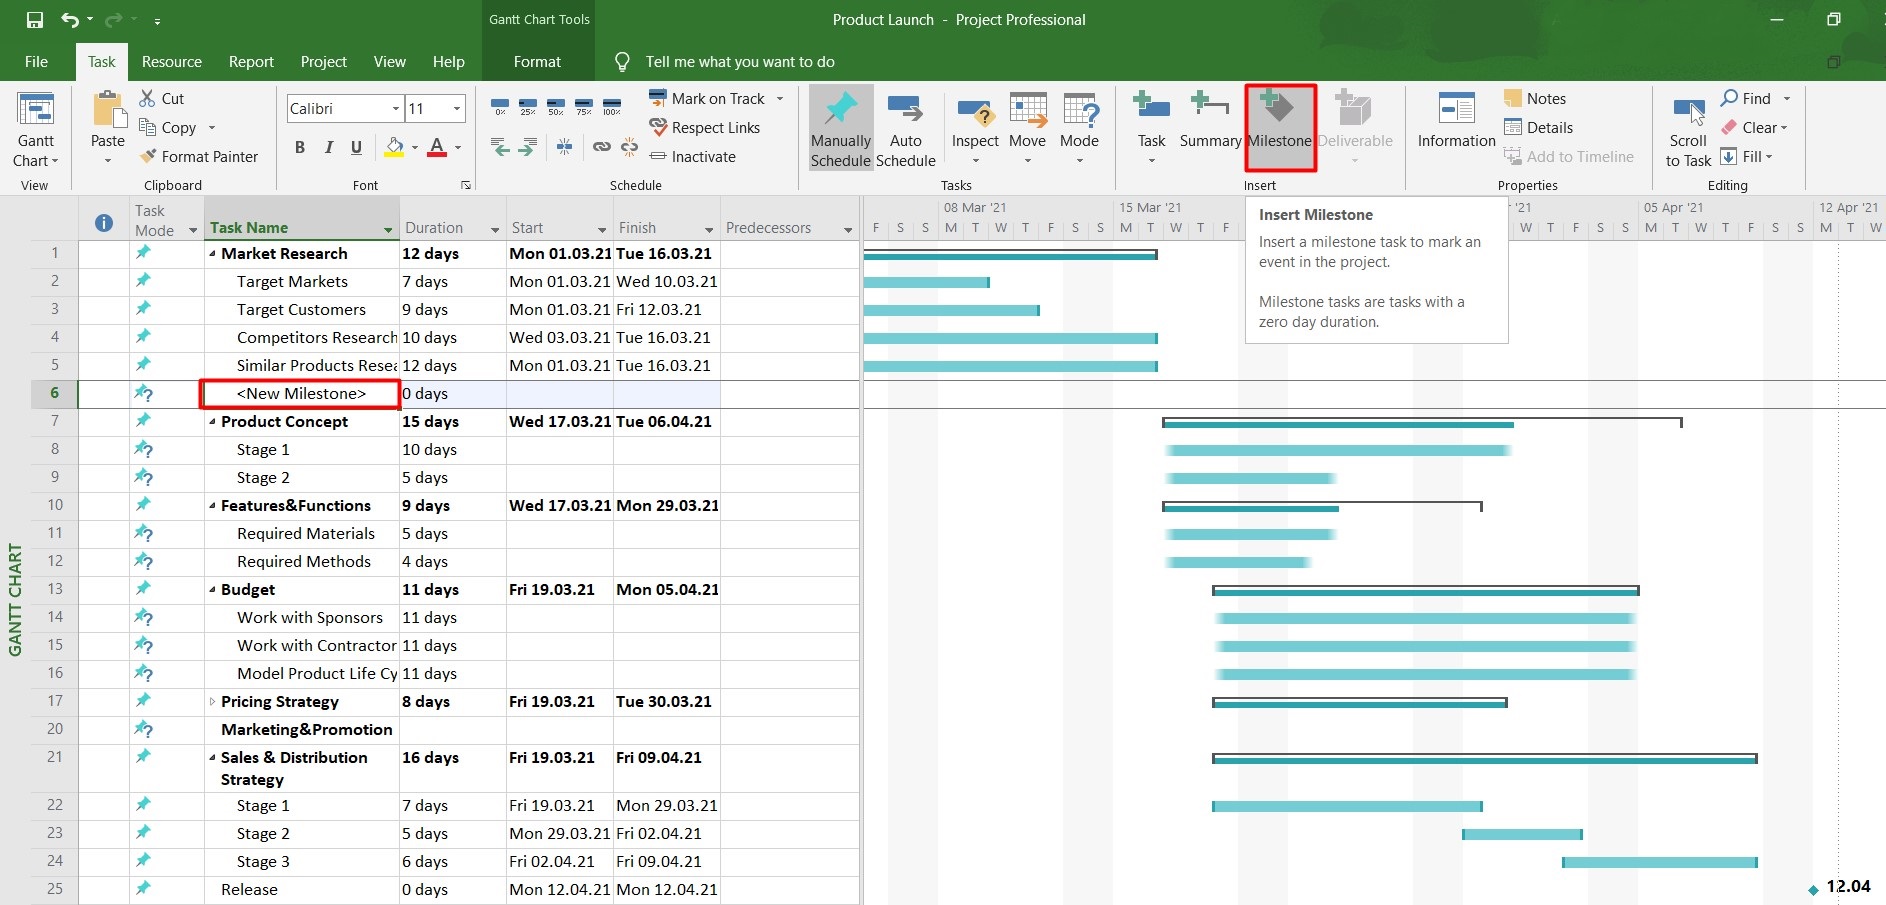
b. Or, insert the row where you want to create a milestone and click on the milestone button.
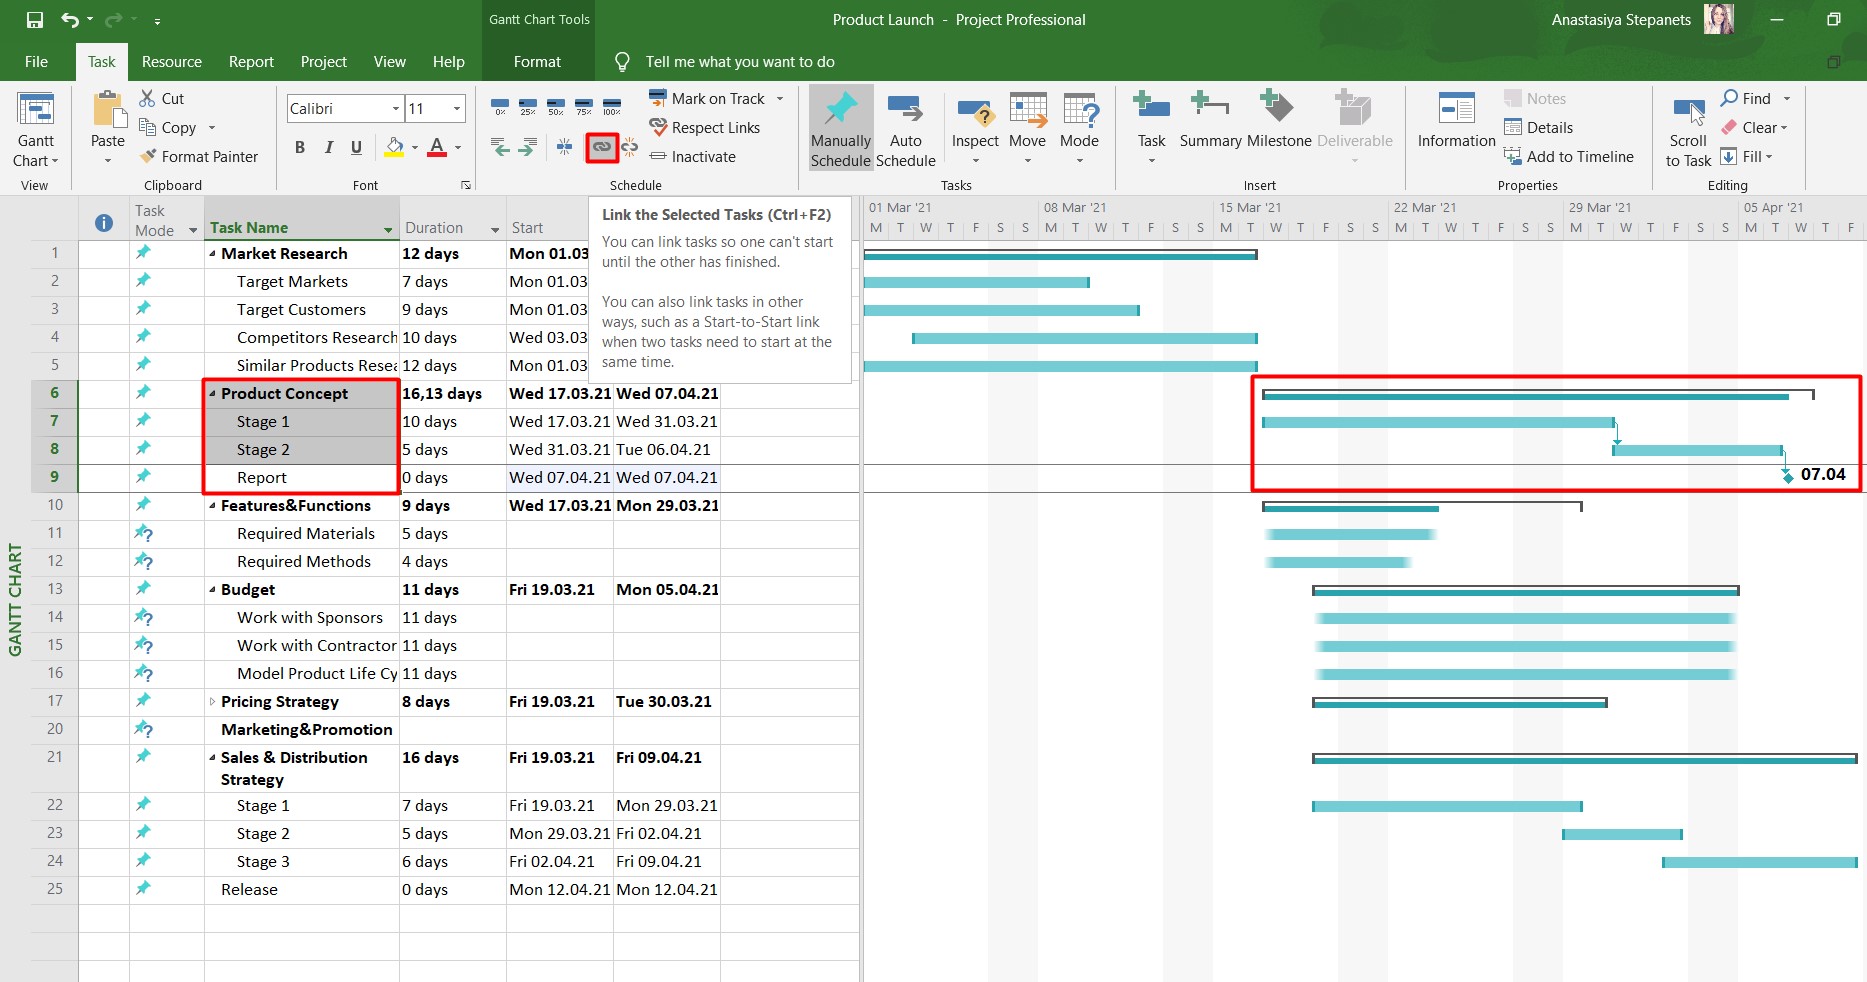
Since milestones are usually used to mark the end of a particular phase of the project, it can be helpful to link appropriate tasks to those milestones. Just highlight the tasks that should be linked to the milestone and click the Link button in the ribbon.
For more information regarding the work with milestones in Microsoft Project, you can read a quick guide here.
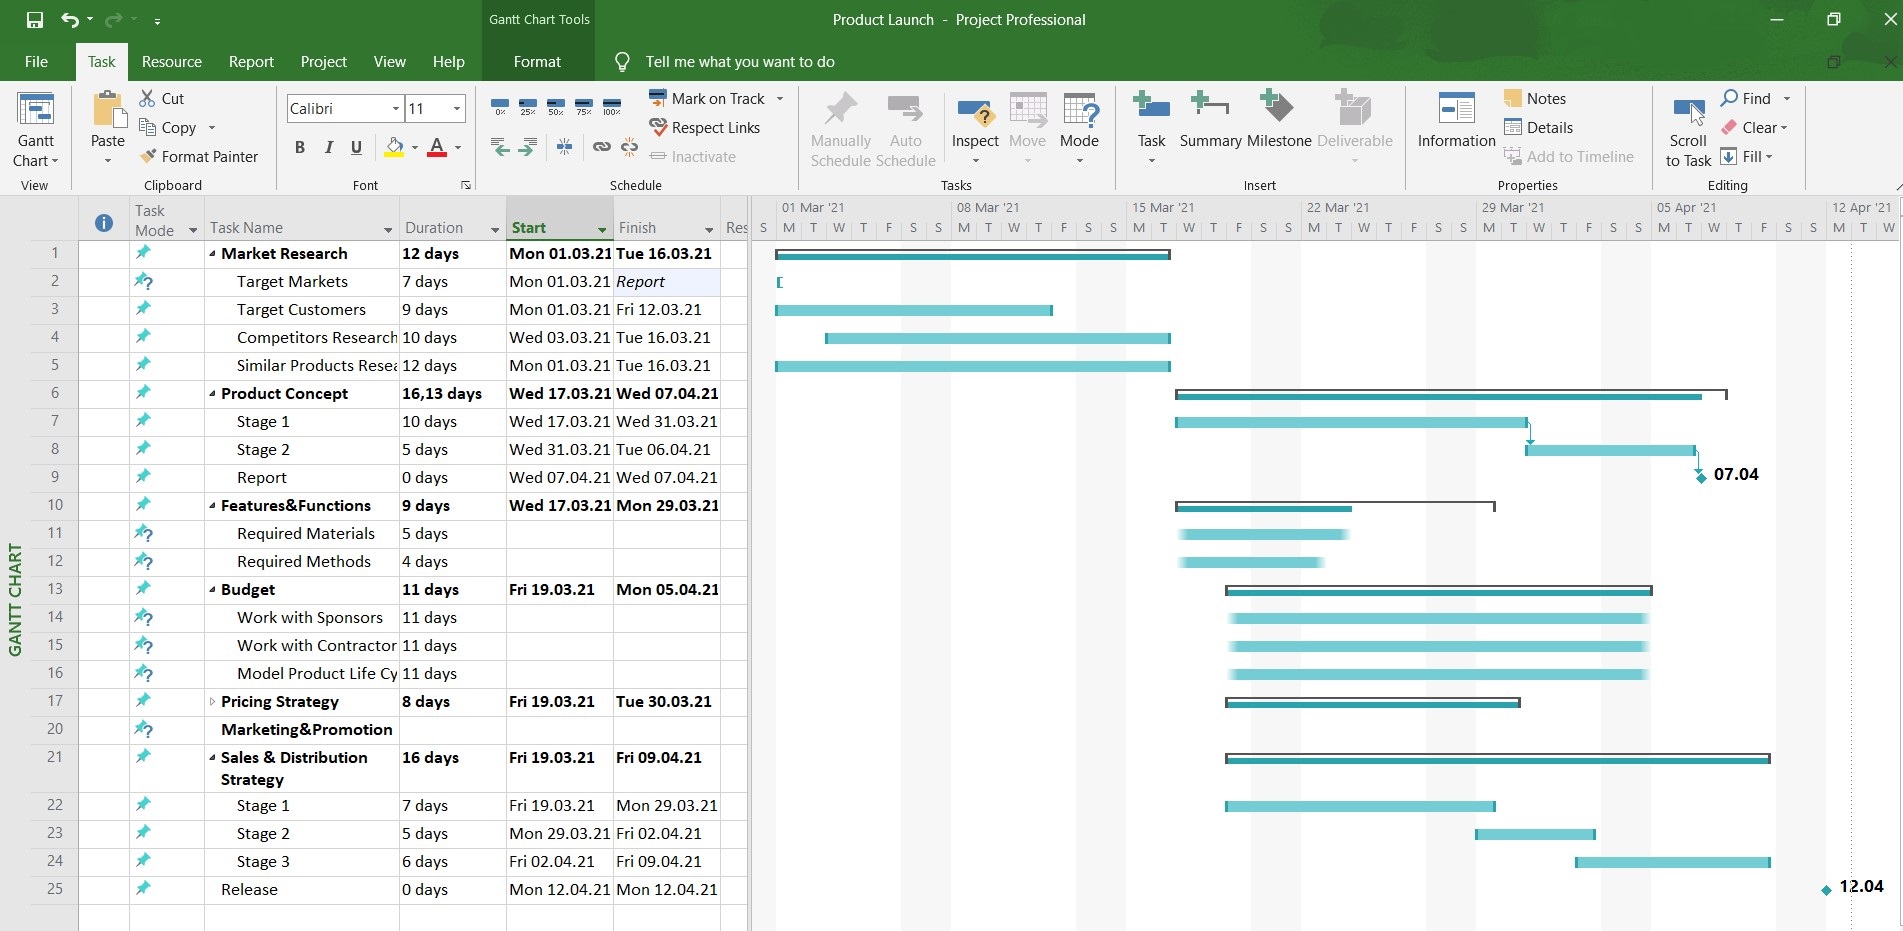
All in all, your basic Gantt Chart in Microsoft Project is ready.
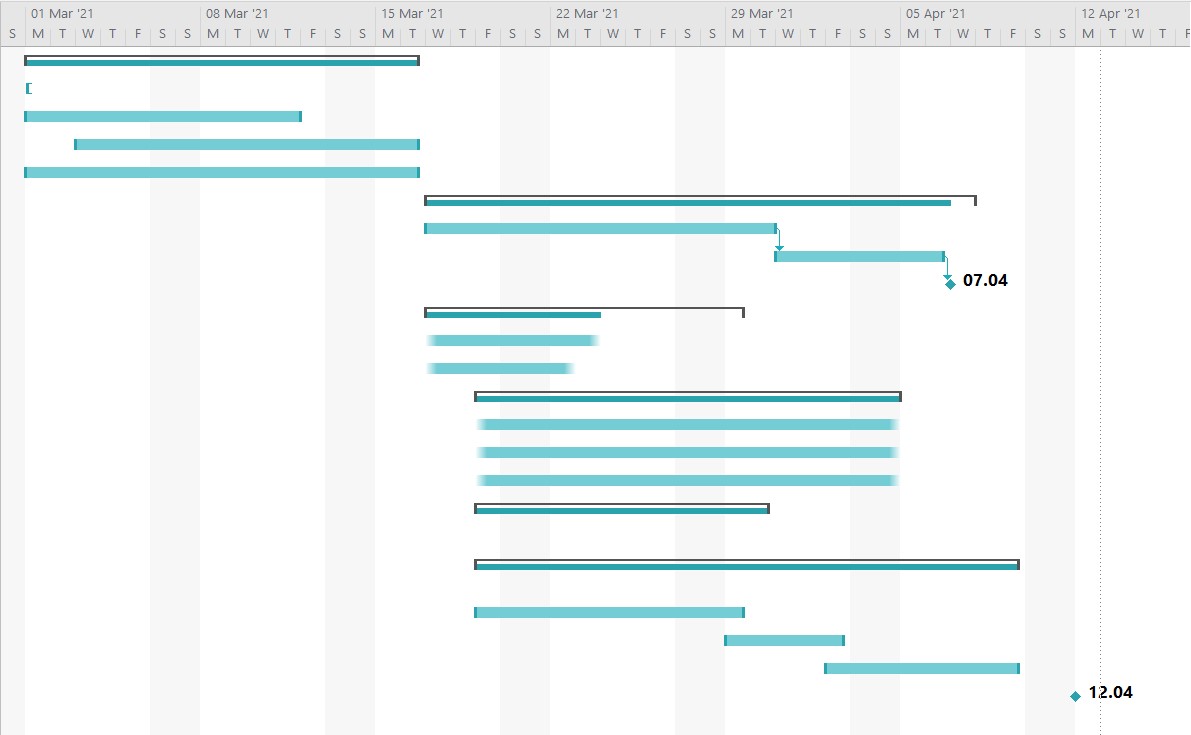
Microsoft Project Gantt chart template and example
A Gantt chart template is a ready-made list of tasks arranged in a schedule mode and shown on a timeline. They can come in different formats depending on the program you work in. A Gantt chart template in Microsoft Project will always be in mpp. format in case you want to upload it to that program or save it afterward.
You can use someone’s templates or create your own. For that, first of all, you have to create a Gantt chart example in Microsoft Project based on which you will create a template afterward. Once you have that example, open the project you want to use as a Microsoft Project template.
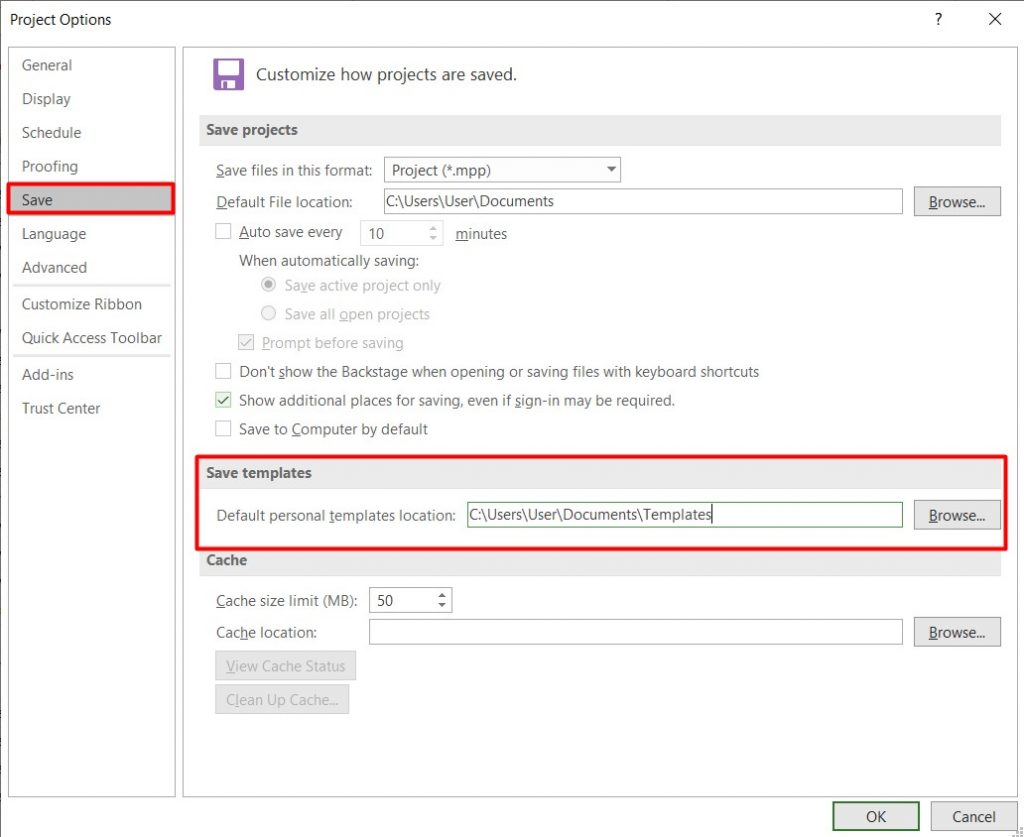
Then go to File → Options → Save → Save templates to choose where you want to save this new template.
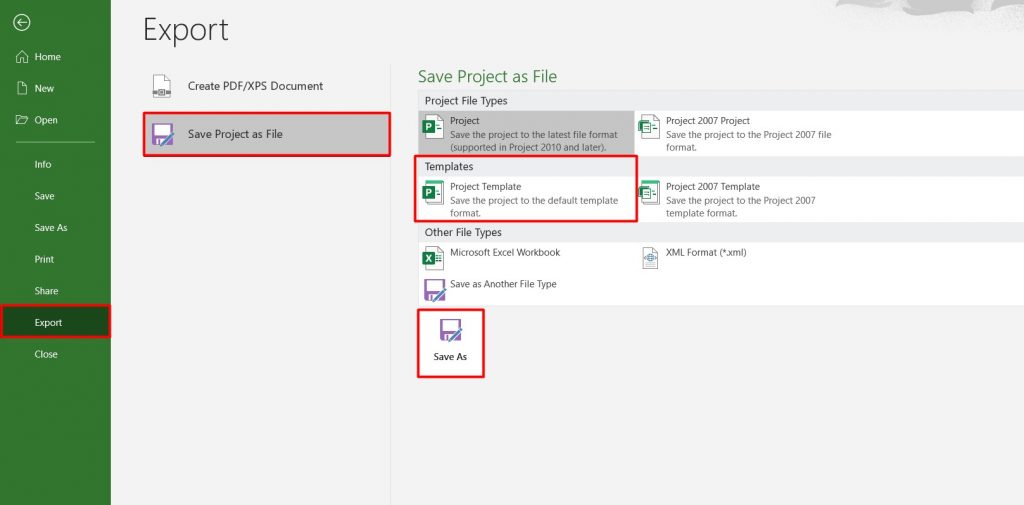
Choose File → Export → Save Project as File → Project Template. Then, you’ll see ‘Save As’ and you’ll have to select the name of the file and project’s type that is Project template.
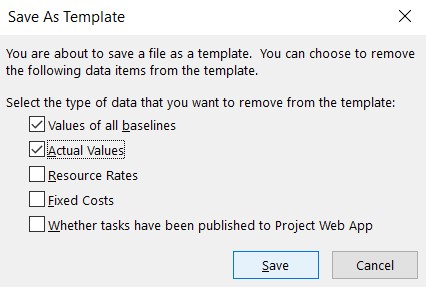
You will see another ‘Save as template’ window where you can select the data you want or do not want to be included in your template. Then choose Save.
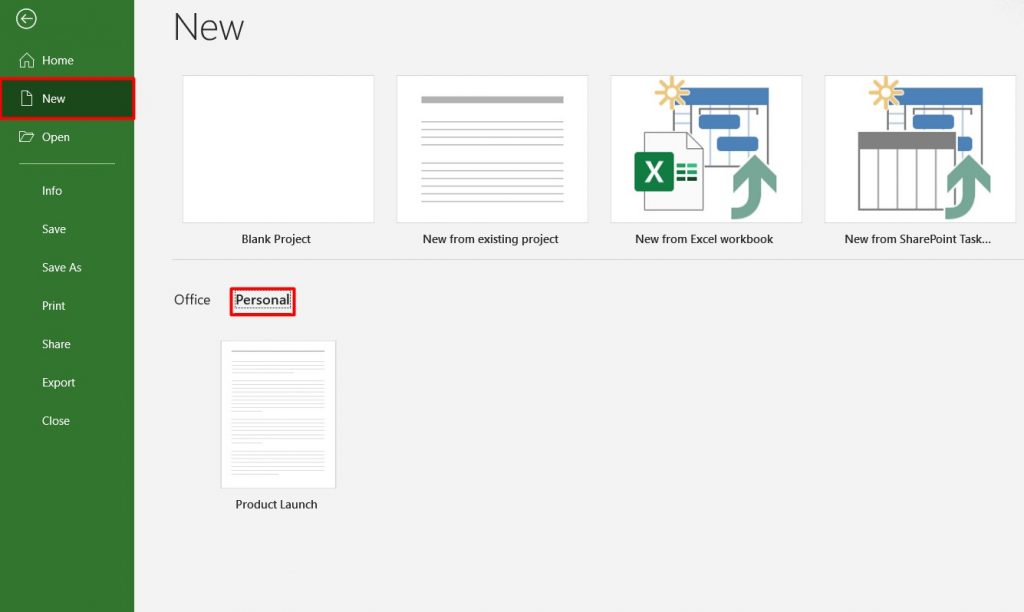
Next time you open Microsoft Project, you can go to File → New → Personal and choose the template we have just created.
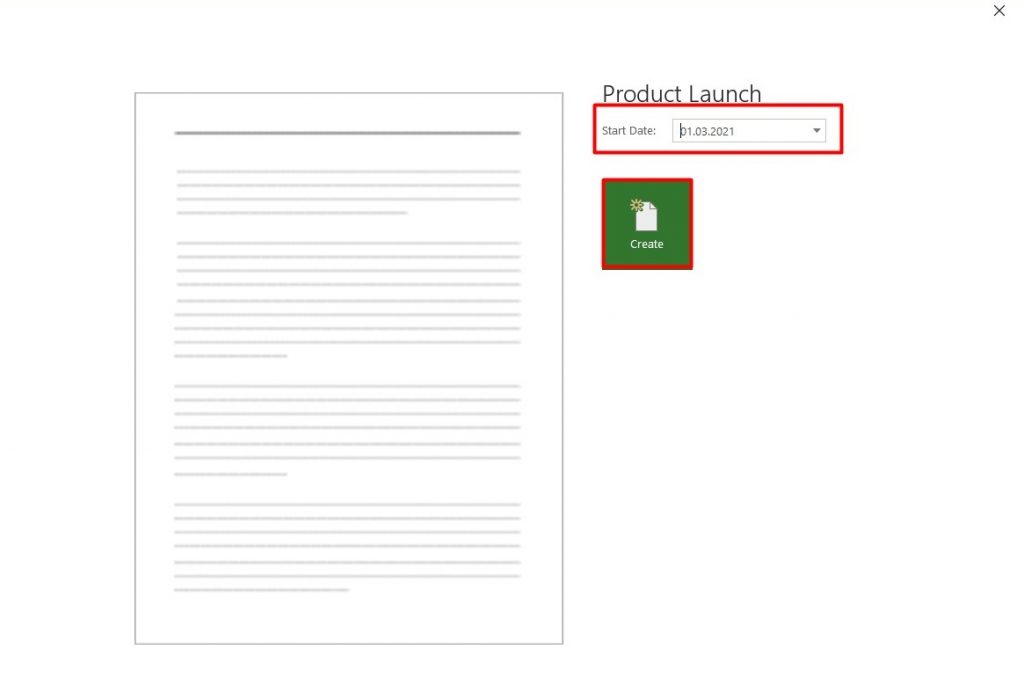
Create a new file of the project – choose start date and press Create.
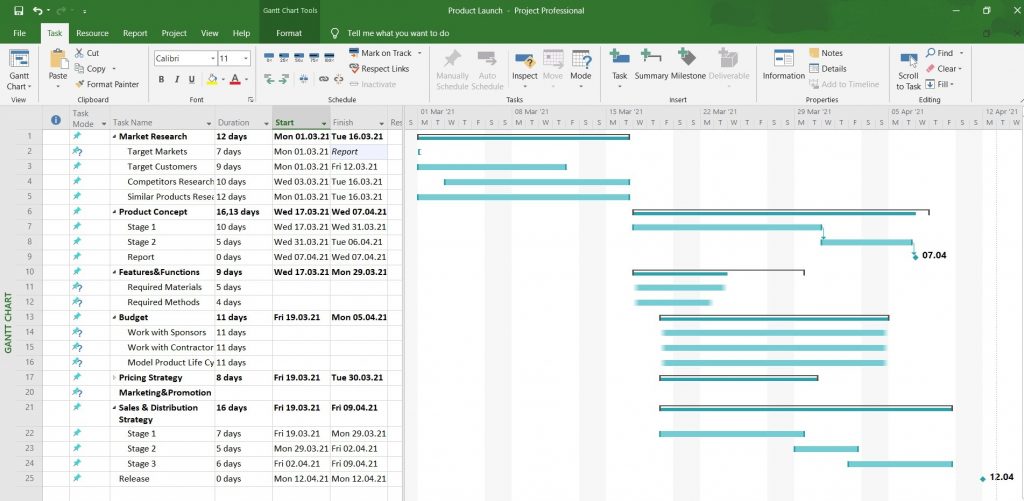
Your Microsoft Project Gantt chart template will be opened with the start date you’ve chosen and will be ready to work in it.
How to share MS Project and export your Microsoft Project Gantt Chart
If you are working on some project, it most probably involves some collaboration and interaction with other people (teammates, business partners, other stakeholders). Thus, there will be a need to share the project or the Gantt chart with them to keep them informed and engaged or to get their feedback. The problem with MS Project, which is quite common, is that people can only open its files if they also have this program. So the question here is how to share MS Project files with people that do not have MS Projects?
Indeed, there is a very easy solution to that. You can simply use some other software that will let you share MS Project plans and Gantt charts in a couple of minutes.
Save your project in MS Project in mpp. format. After that, upload your mpp file to GanttPRO. For that, open GanttPRO MPP Viewer page and then drag&drop your mpp file or upload it from your computer.
Select “Open in GanttPRO”, create an account and enjoy browsing and editing your project.
You can also find out more details on how to open an mpp file on the GanttPRO blog.
Printing Microsoft Project Gantt Chart
Another common request MS Project users may have, is on how to print Microsoft Project Gantt Chart. Here, again, you can use GanttPRO. After uploading your project with a Gantt chart in mpp format to GanttPRO, if you don’t need to make any extra edits, go directly to ‘Export’ option and select PDF format. There you can also choose an orientation, size, and data from your project that should be included in the printed version.
How to create and work with Gantt charts more effectively and faster
Even though it may seem easy to create a Gantt Chart in Microsoft Project, it only applies to the very basic Microsoft Project Gantt chart. Thus, if you need more elaborate and complex functions, you will have to spend quite a lot of time looking for tutorials and trying to learn how to navigate this well-regarded PM tool.
But chances are you don’t have that much time and just need a quick, easy and effective solution. In that case, GanttPRO Gantt chart software can be the right option for you. Its rich and useful functionality like dependencies between tasks, their assignment to team members, resource management, critical path, milestones, and many others, will ensure that your project is managed smoothly and effectively. At the same time, an intuitive interface and automated processes will make the creation and work with Gantt charts easy and fast.
Unlike in MS Project, in GanttPRO sharing your project and Gantt chart is as simple as ABC. At any stage of the project, any moment or task can be shared with anyone through URL or printed in a few minutes and shared or presented on paper. You can effortlessly import or export your Gantt chart and projects in various formats.
Explore even more reasons to use GanttPRO as an alternative to Microsoft Project in this video:
There are also plenty of Gantt chart templates for different industries that you can use to plan and manage your project.
Gantt chart for IT development:
- Website development.
- Software development.
- Game development.
- Program development.
- Agile software development.
- App development.
- Android application development.
- Mobile app development, etc.
- Construction project schedule.
- House construction, renovation, remodeling, etc.
- New home construction.
- Construction management, etc.
Gantt chart for event planning:
- Performance planning.
- Conference planning.
- Fundraising event planning.
- Exhibition planning.
- Workshop planning, etc.
Gantt chart for marketing campaigns:
- Product marketing.
- Content marketing.
- Digital or online marketing.
- Offline marketing, etc.
- Architectural design.
- Web design, etc.
And many more!

Gantt chart project planning tool
Plan and manage your projects easily with a Gantt chart.
Sign up for free