How to Use Microsoft Project Predecessors to Sequence Tasks in a Project
April 15, 2022 / Estimated reading time: 7 minutes
One of the principal purposes of Microsoft Project is to assist in the development of a project schedule. This is an essential part of project management which quite often defines its success.
When you schedule tasks, you can see that some of them are connected and inherently conditioned to start one after the other. For instance, it is not possible to test a product before it has been designed, to release a paper book before it has been printed, and to print it before it has been written.
Examples like these abound in any industry and within any project type. Scheduling activities may often require establishing links between such tasks. This can help to plan a project timetable, allocate available resources correctly, and monitor the process afterward.
Being a scheduling tool, MS Project provides a possibility to identify such tasks as predecessors and successors in a project. However, just as with most of the features of this program, it may be difficult to understand how to use predecessors in Microsoft Project. No worries, though. As a part of our Microsoft Project user guide, we have prepared a brief and simple explanation thereon.
Let’s see in this article:
- What are predecessors in Microsoft Project?
- How to add predecessors in Microsoft Project.
- What other programs can help use predecessors in a project.
What do predecessors mean in Microsoft Project?
Predecessors in Microsoft Project are those tasks that define when their dependent tasks can start or finish. The dependent task, in that case, is also called the successor.
Project managers usually use predecessors in Microsoft Project to lay out the sequence of the tasks in a project and link tasks that follow each other or have some other kind of relationship.
The possibility to add predecessors is particularly useful when you work on complex projects with many tasks and need to establish links through different project stages and parts, not just the adjacent ones.
How to add predecessors in Microsoft Project
Once you have entered the list of tasks in MS Project, you can start adding the predecessors.
If you are trying to build a project schedule, it is also recommended to set the duration of each task and to switch from a Task sheet view to a Gantt chart view. The latter will provide you with a visual overview of all the links you add to the tasks.
First of all, add a Predecessor column to your Task sheet. For that, click on Add new column or right-click on any existing column and then on Insert column.
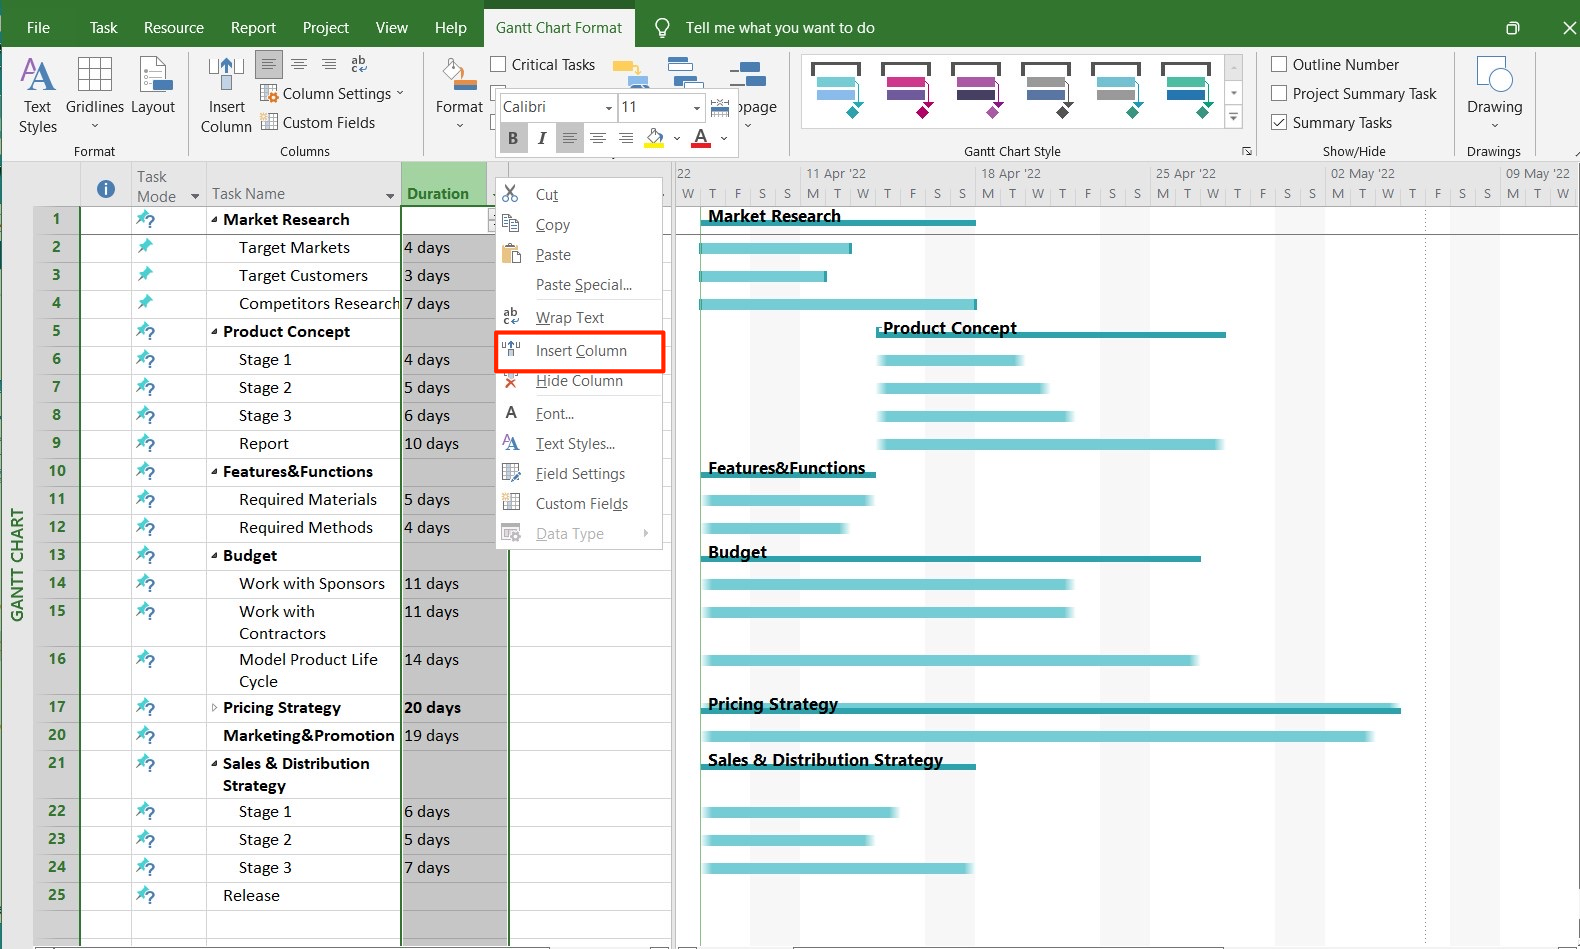
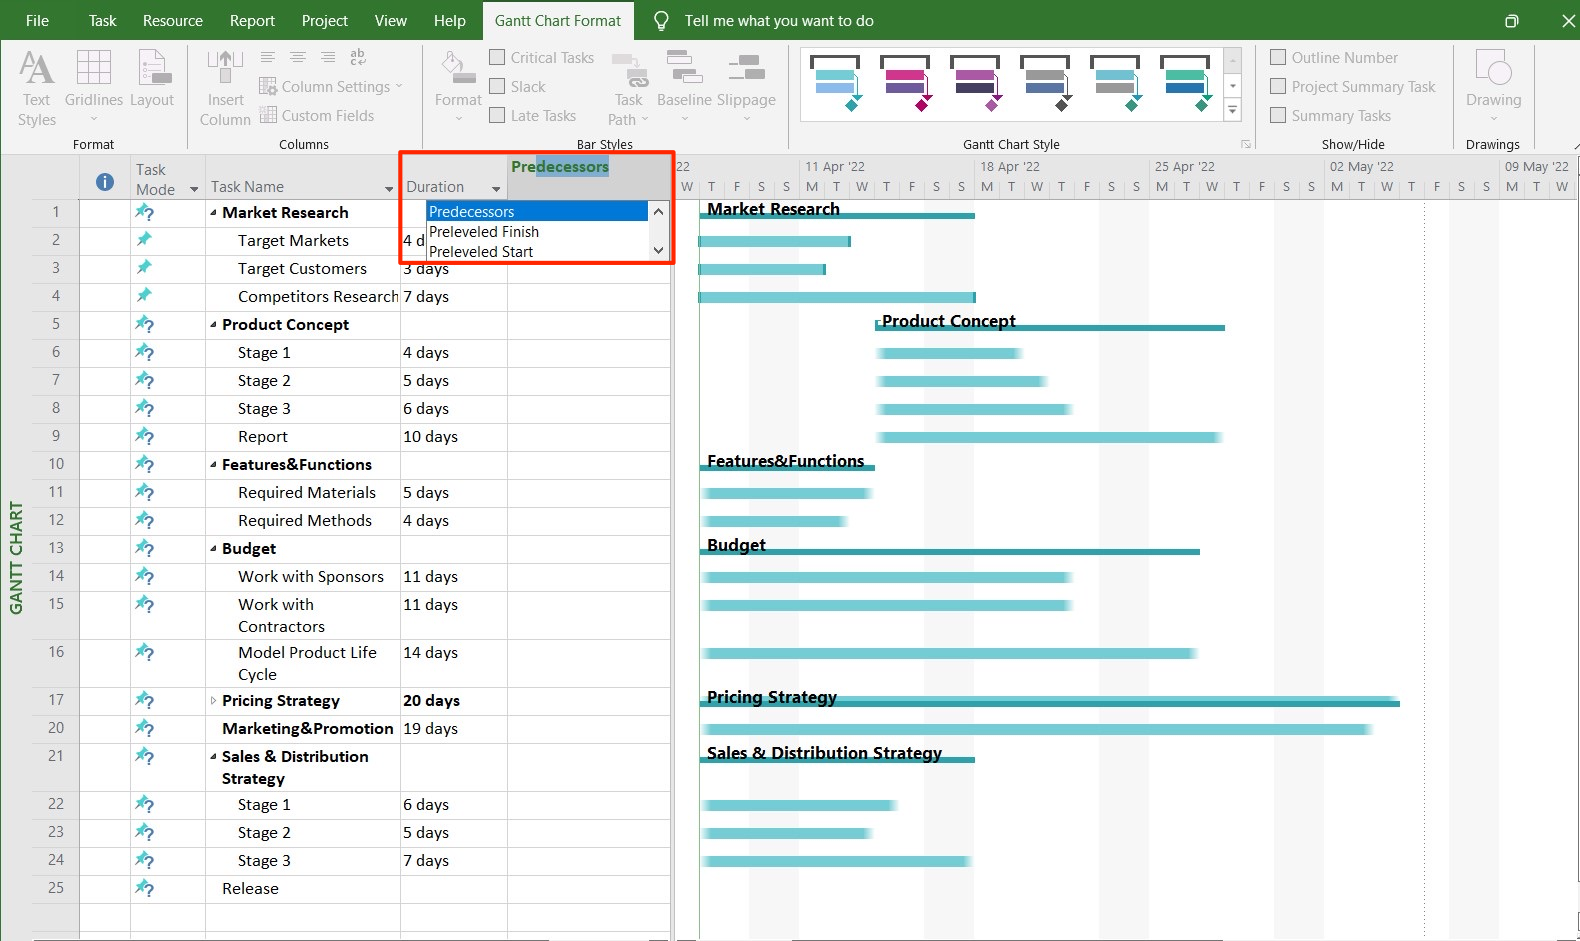
Choose Predecessor from the list or just start typing and it will appear.
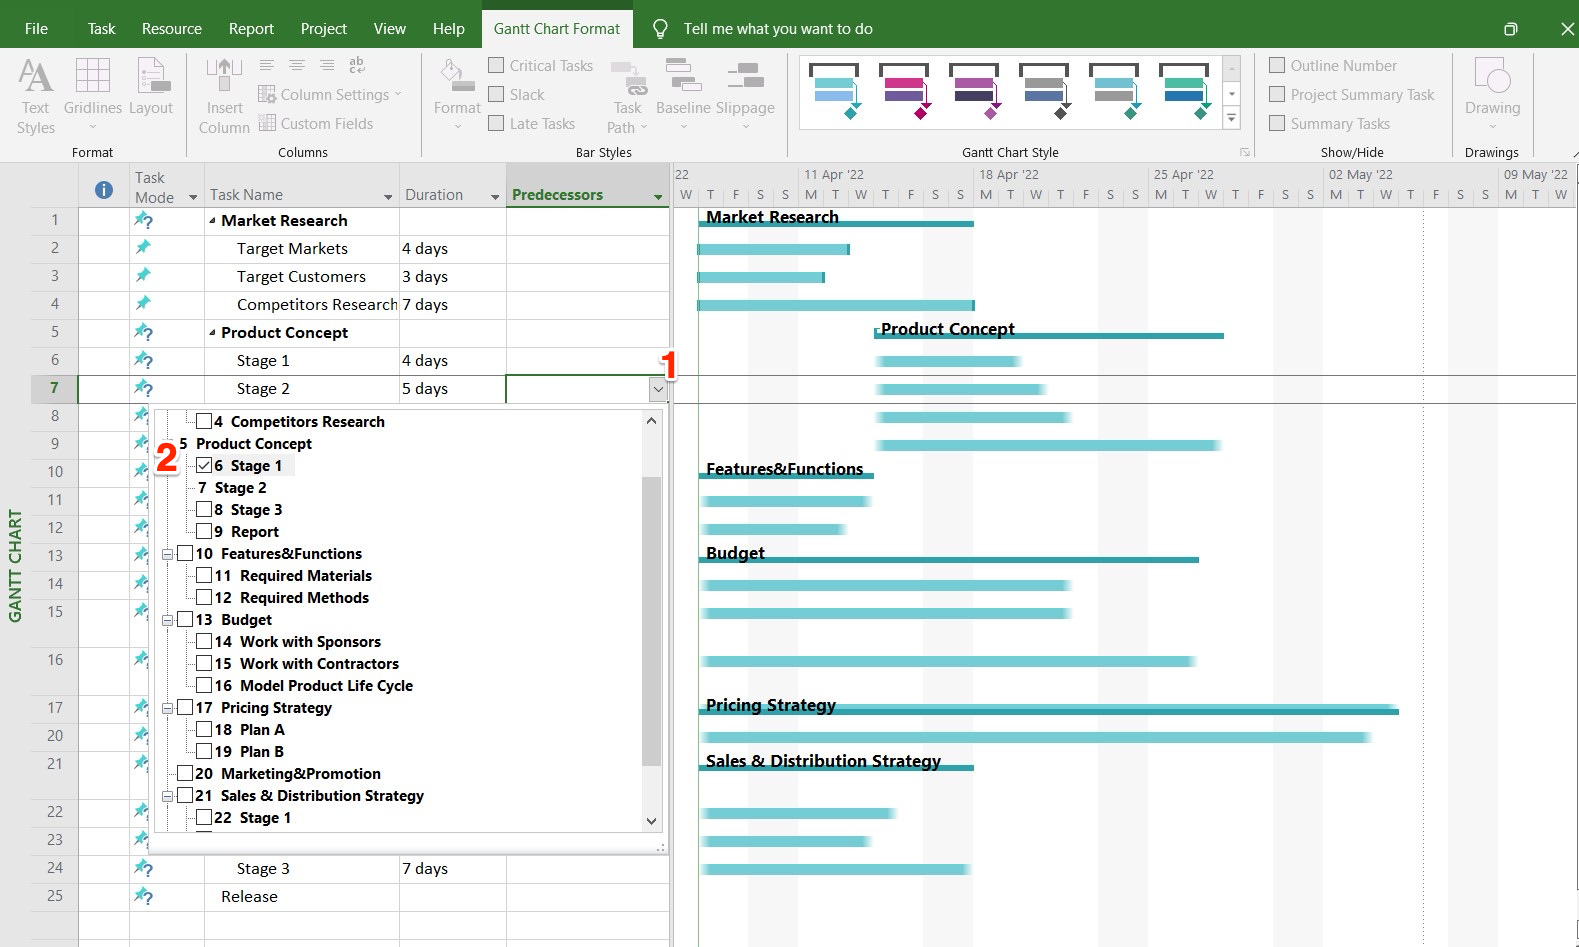
After you have added the Predecessor column, select a successor task (the one you want to add a predecessor to) and click on the drop-down sign in the Predecessor cell. You will see the list of all project tasks. Just check the box for the task that is supposed to be the predecessor.
In our case, for example, a summary task “Product concept” consists of 3 stages and a subsequent report. Let’s suppose all the stages should commence one after another. Thus, each stage will be a predecessor of the previous one.
That way, to add a predecessor to the task “Stage 2”, you have to click on the predecessor cell and select “Stage 1” from the list. Then do the same for other tasks from this group.
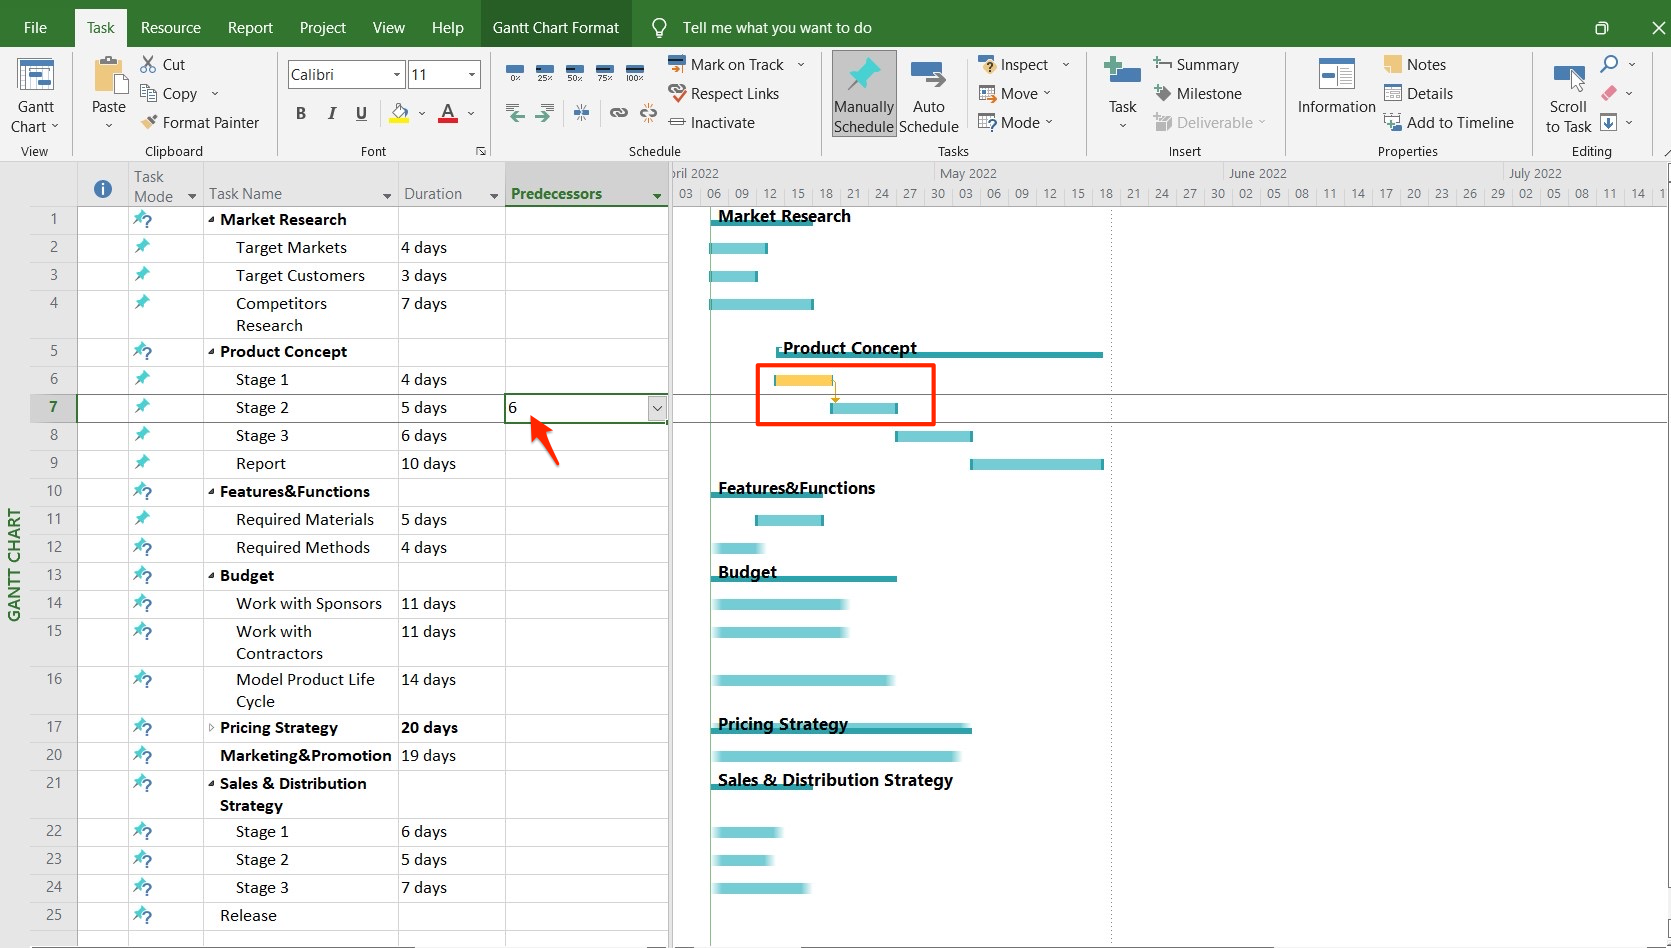
Alternatively, you may just type the number of the activity in the Predecessor cell. In our example, that would be activity 6 for “Stage 2”, activity 7 for “Stage 3”, and activity 8 for the “Report”.
When you add the predecessors, you will see the corresponding links on the Gantt chart.
According to project management theory, it is not recommended to establish predecessors for summary tasks. However, tasks within summary tasks can also follow each other. Let’s see how to use predecessors in Microsoft Project in such cases by getting back to our example.
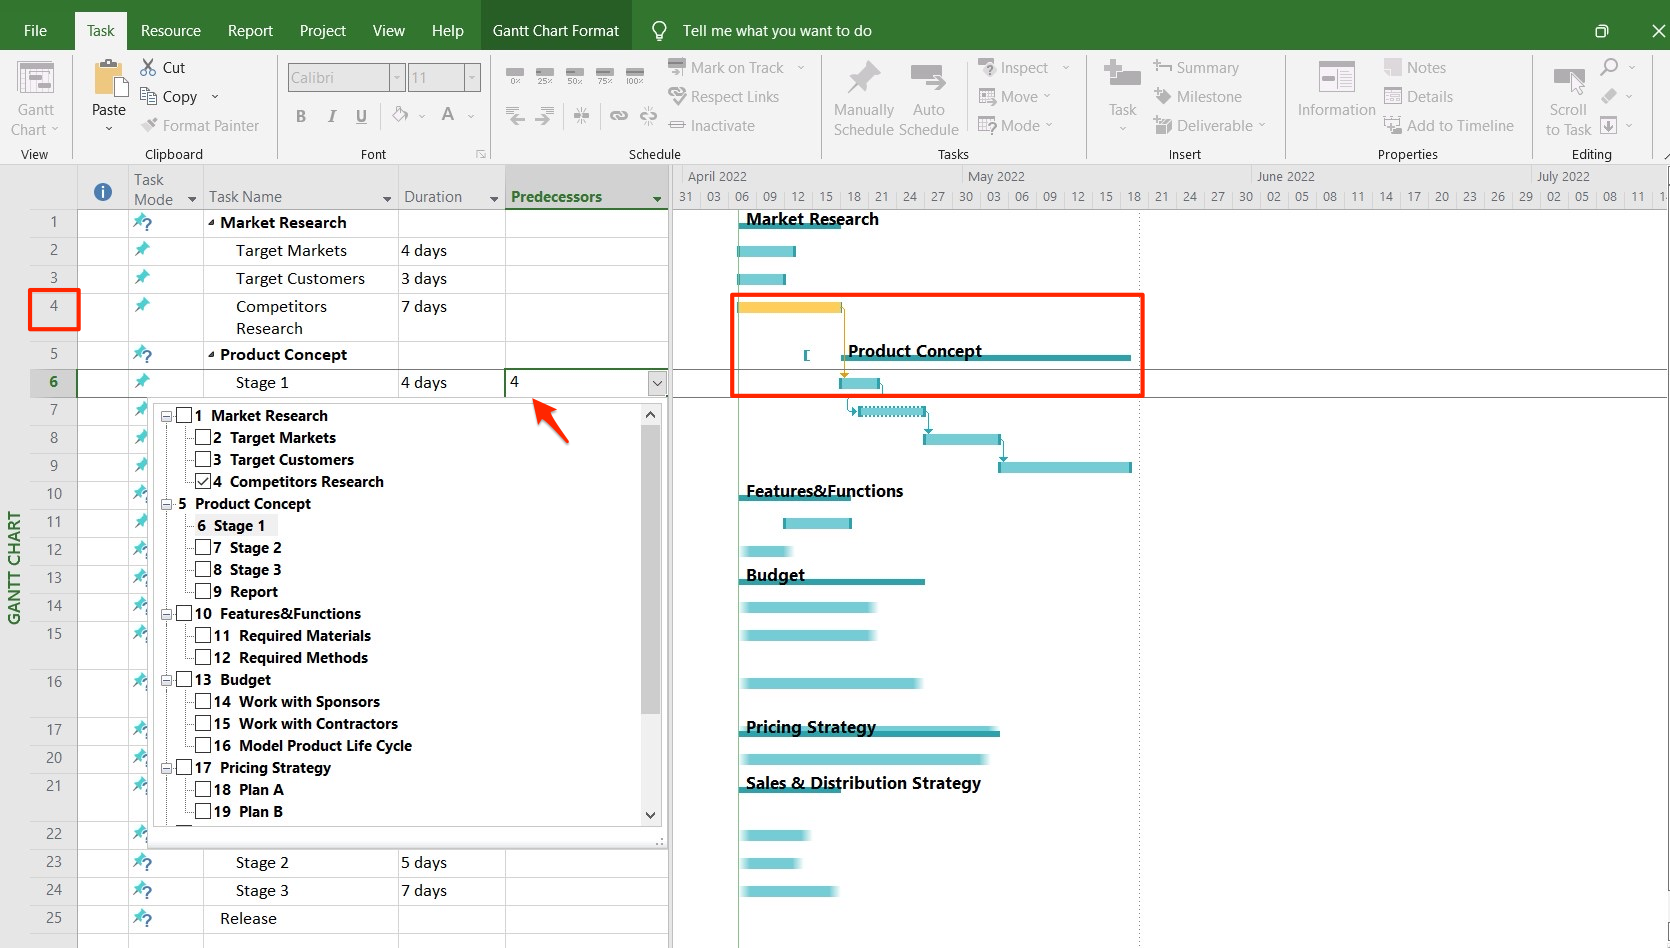
We can start working on the “Product concept” only after “Market research” has been completed. Therefore, the Competitors research task will be a predecessor to the Stage 1 task in the “Product concept”.
To add a predecessor in that case, simply type in 4 in a predecessor cell for “Stage 1”. A corresponding link will also appear on a Gantt Chart.
Is it possible to define multiple predecessors in Microsoft Project?
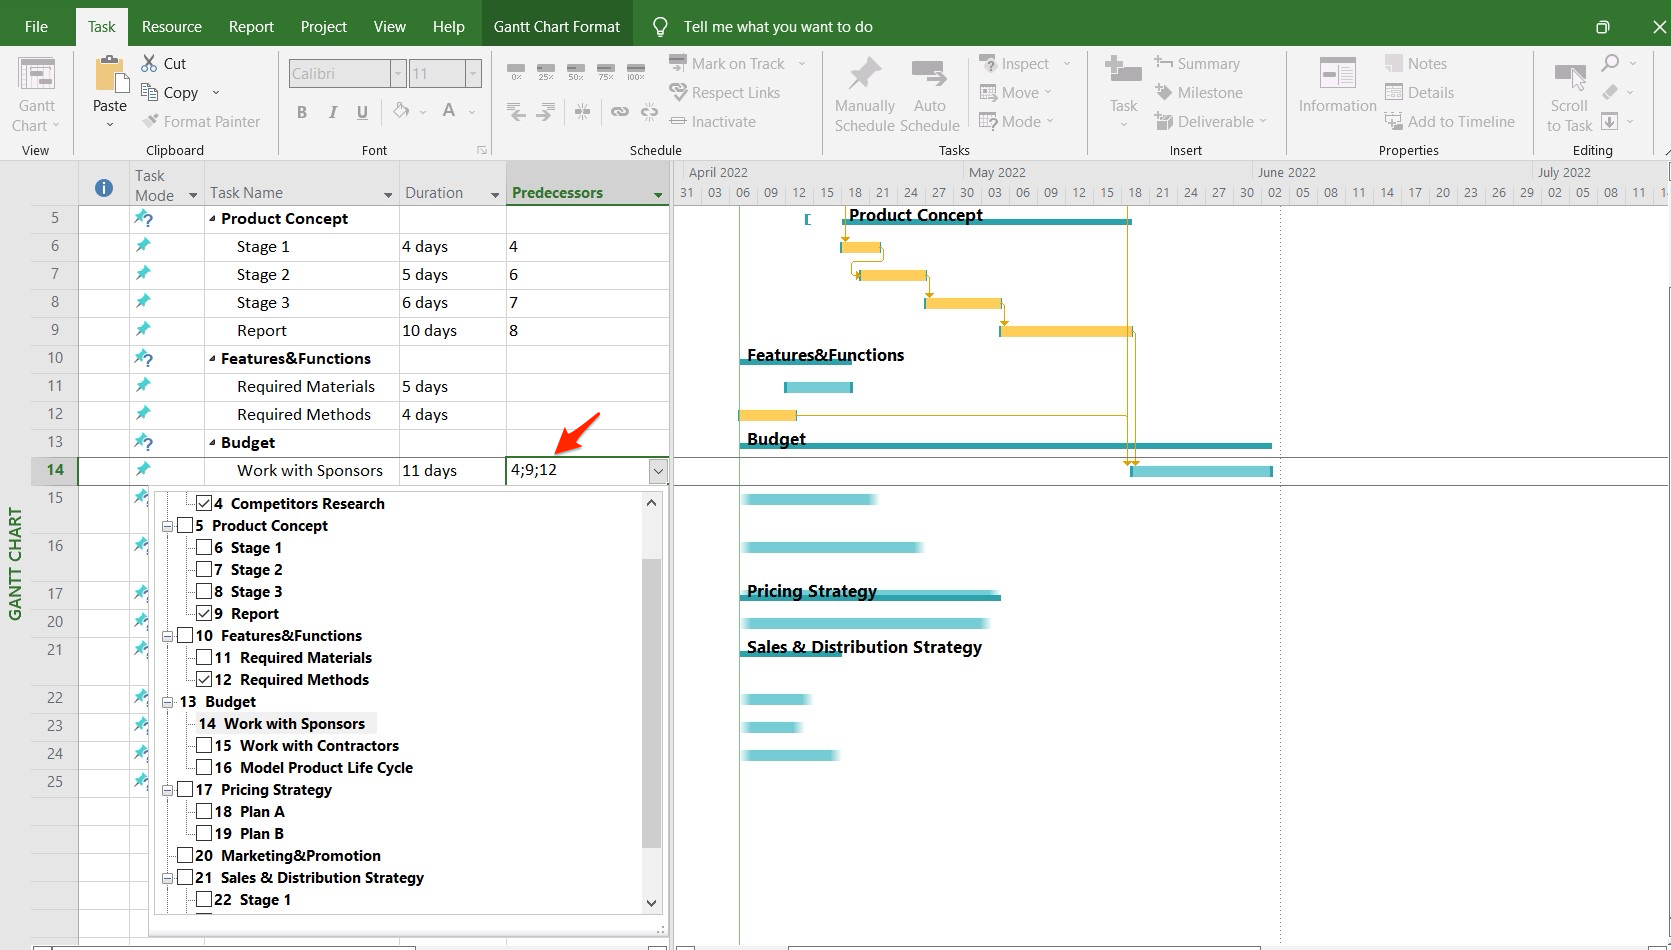
Some tasks may only start when several other tasks have been completed. So, can you have multiple predecessors in Microsoft Project? The answer is yes. You can have multiple predecessors in case you want to link several tasks. The steps are the same as when you add a single one.
Just check all the necessary tasks in the drop-down list or type the required numbers separated by semicolons in the Predecessor cell.
If you have set task duration in the beginning, as soon as you have finished establishing predecessors, you can look at the Start and Finish columns. All the dates will be adjusted according to the established links and you will get your project schedule. It will also be visualized on the Gantt chart. 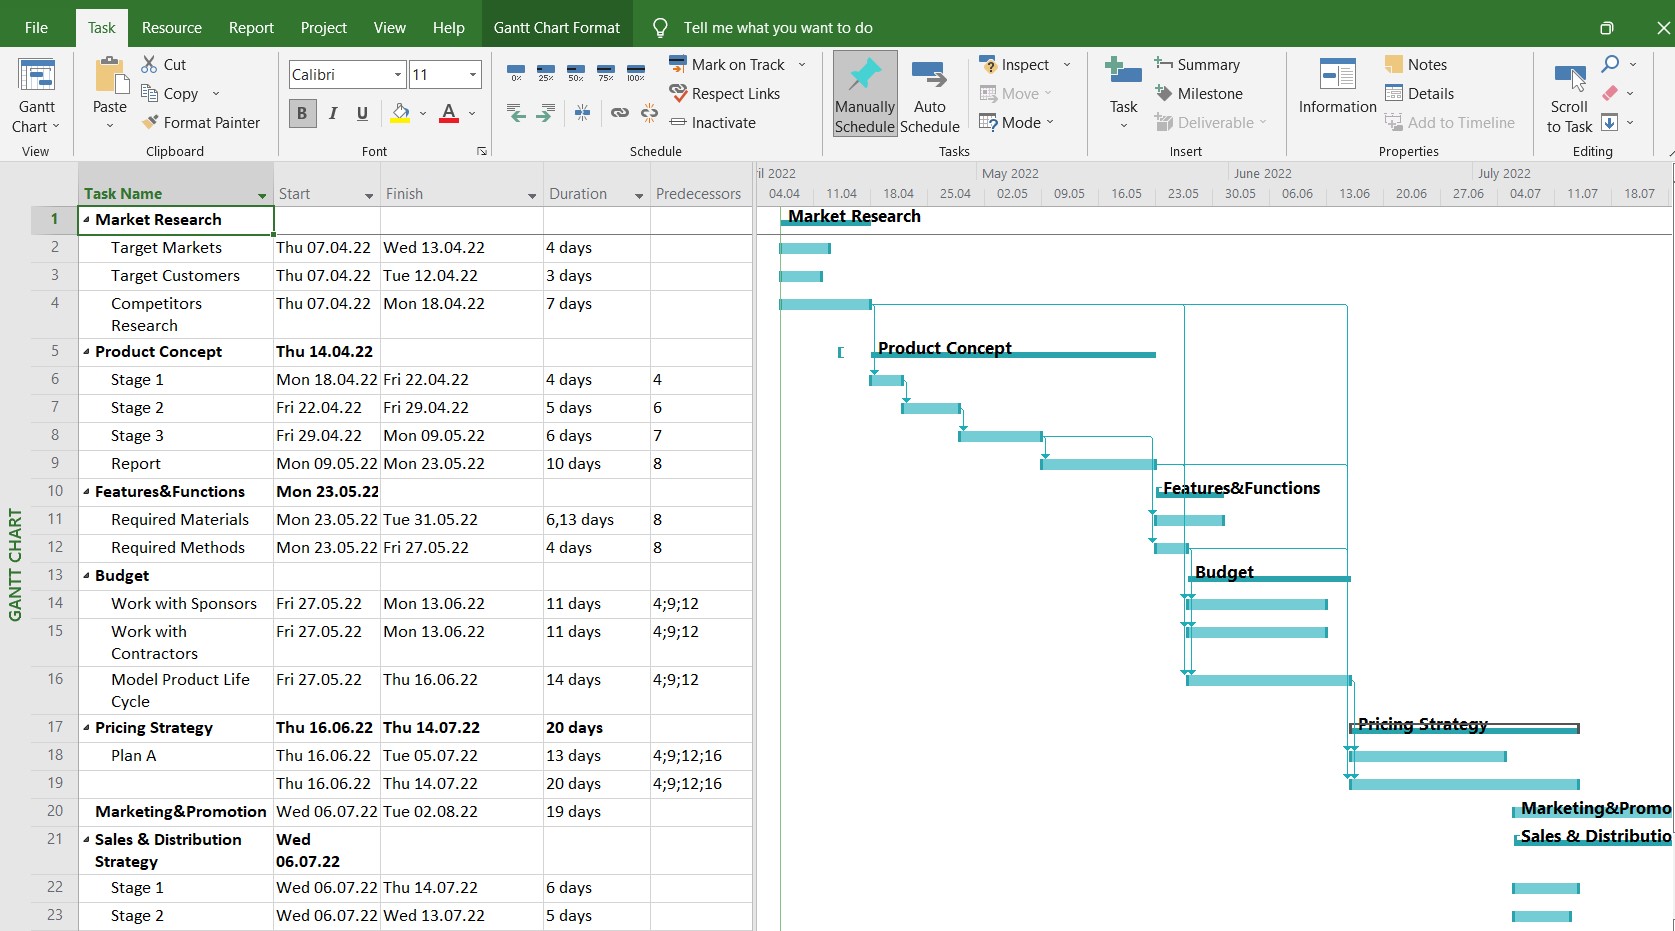
Additionally, if you enable Auto Scheduling, all the tasks that are dependent will be automatically rescheduled every time you change dates in linked tasks.
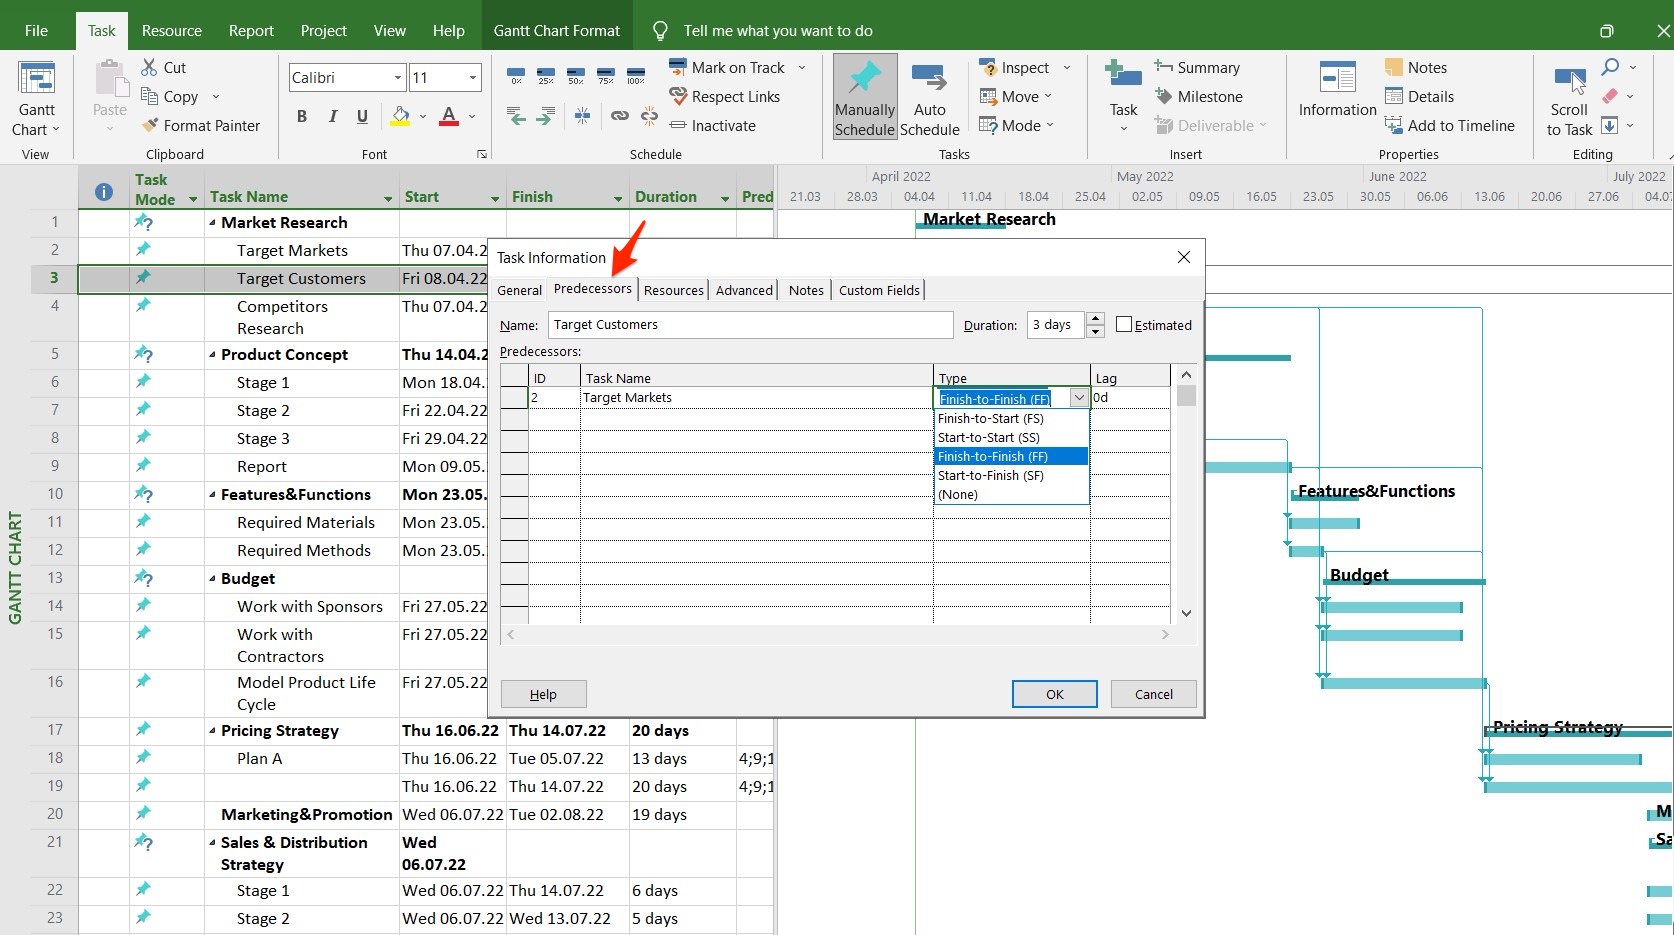
Bear in mind that predecessors are added as a finish-to-start dependency with zero lag time. To choose other dependency types, click on Information at the top toolbar and open the Predecessor tab. Choose the type and click on OK. This will be displayed both on the Gantt chart and in the Predecessor column.
In our example, the research of “Target Markets” and “Target customers” should be completed at the same time, so we can set a Finish-to-Finish dependency.
How to clear predecessors in Microsoft Project?
The easiest way to clear predecessors is by clicking on the required Predecessors cell and deleting the indicated predecessors there. Alternatively, you can uncheck the tasks in the drop-down menu, where you have added them.
How to work with predecessors in GanttPRO
Nowadays, there are modern and easy-to-use Microsoft Project alternatives that will help you schedule tasks within your project instantly without the need to check for tutorials.
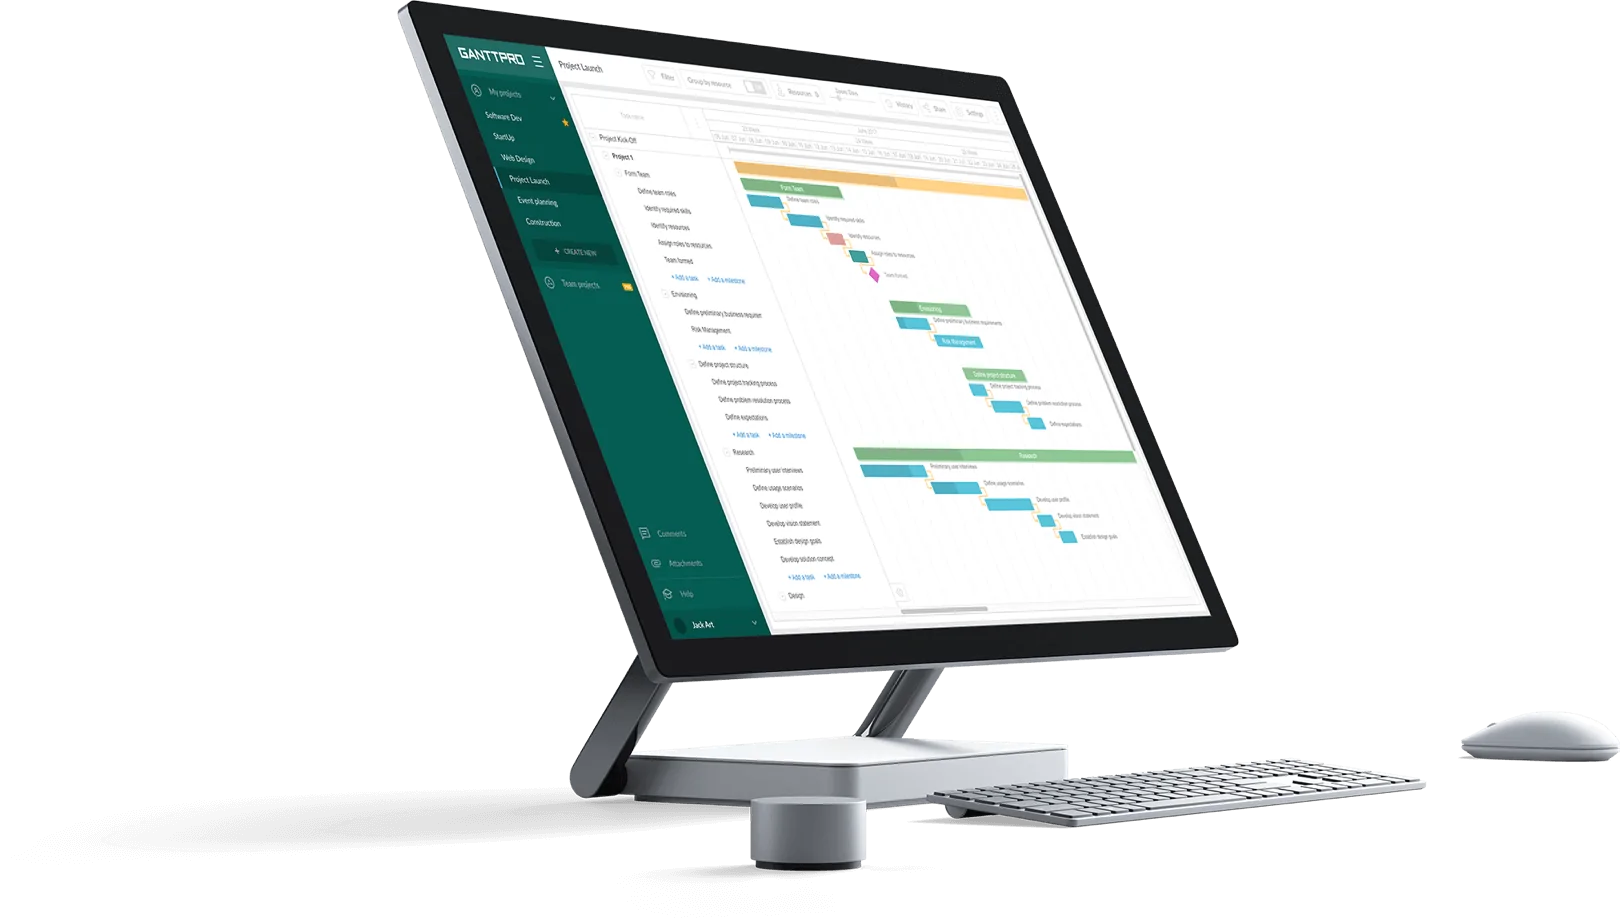
GanttPRO is just one of those. This online Gantt chart maker will assist you from the moment you start drawing up your plan till the last day when it’s completed. You can manage and keep track of a limitless amount of tasks and projects specifying all the details for their smooth implementation.
You can work alone or bring up your team and take advantage of GanttPRO collaboration features. Time and resource management features will let you improve the workflow and find the optimal balance for their use.
Just like with the rest of the features, establishing dependencies and predecessors in this Gantt chart maker is straightforward and intuitive. As in Microsoft Project, predecessors in GanttPRO are defined as the tasks that have to be completed before the dependent task starts or finishes.
To add a predecessor in GanttPRO:
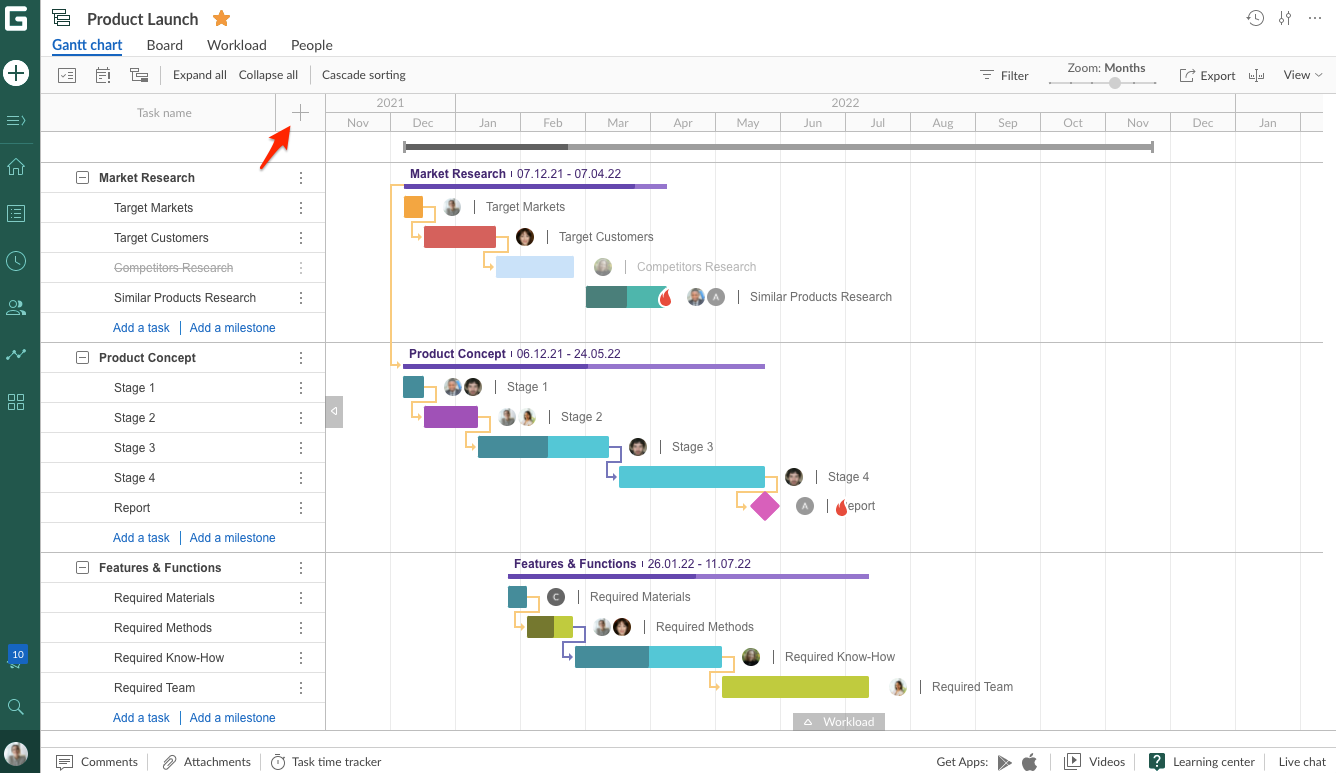
1. Click on the + sign in the top right corner of the project grid to add a Predecessor field.
2. Check the box for a Predecessor and for Work Breakdown Structure, as it will be easier to follow the sequence on a project grid.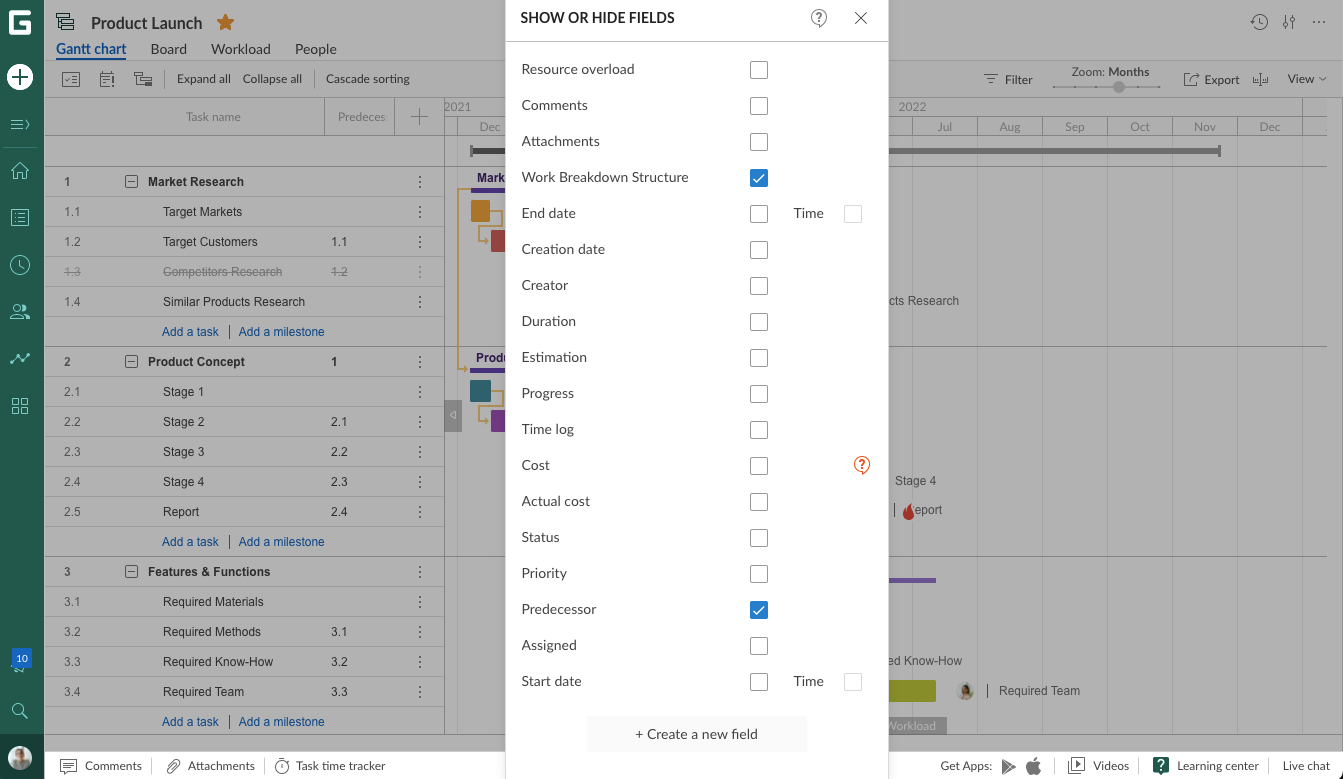 3. Сlick on a Predecessor field for a corresponding task and start typing a task name or task number. Then choose the one you need from the drop-down list. This is it.
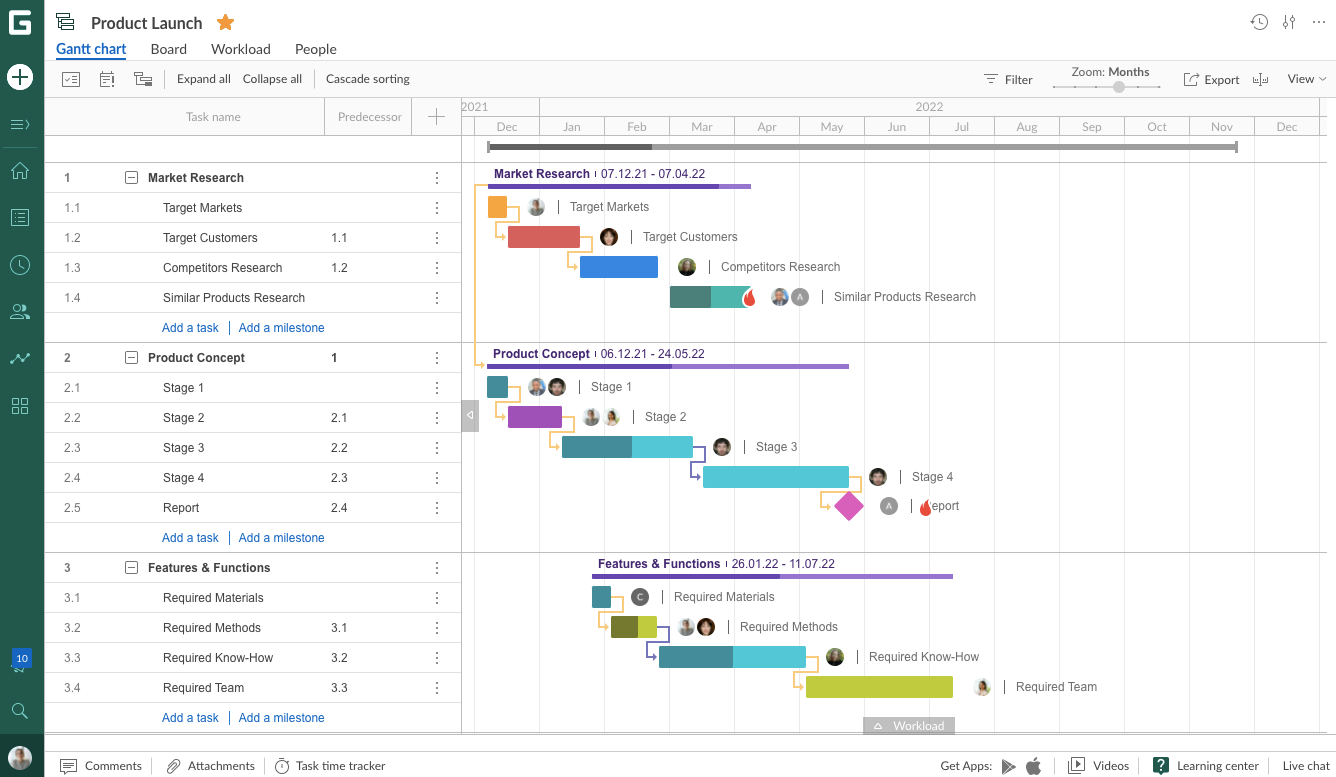
As with Microsoft Project predecessors, you can also add lag/lead for the successor task by double-clicking on the link between tasks. Plus, you can change the dependency types in Task settings by double-clicking on a successor task bar or opening task settings from the project grid.
Watch the video to explore even more reasons to apply GanttPRO as an alternative to MS Project.
See for yourself how easy it is to work in GanttPRO. Create an account in no time and browse through all of its features during a 14-day free trial.

Gantt chart project management tool
Plan and manage your projects easily with Gantt charts.
Sign up for free