How to Be the Best in Task Management with GanttPRO: Time Log, Reports, and Google Drive Integration
July 24, 2019 / Estimated reading time: 6 minutes

Charles Darwin once said:
A man who dares to waste one hour of time has not discovered the value of life
.If to rephrase it and shift emphasis to project management, it could sound something like “A project participant who dares to waste one hour of time has not discovered the value of projects”.
We know how crucial time tracking and time management can be in project planning.
We dropped out of view a little with new releases since February when we had implemented Custom columns and a few more features. The answer is simple: we have been preparing a huge update that can draw a new line in the development of our Gantt chart tool and become a landmark.
So, what’s new in the release.
Keep track of time spent on tasks with Time log
Perfect projects are those projects that have all the tasks completed in a timely manner by every team member. When a project manager assigns a task with the estimated time, that’s great. But this time is estimated. In most cases, it differs in the end.
This is where personal time log takes the stage.
What is a time log?
A time log is a set of records that shows the sequence of time intervals spent on tasks.
For project participants, it allows:
- Tracking the time they spend on tasks.
For project managers, it allows:
- Seeing how much time team members spend on tasks and updating plans if needed.
How to work with time log in GanttPRO
Working with time log in GanttPRO is easy.
You can put log values for a task you work on in two ways:
- Adding a new “Time log” column clicking on the + sign in the top right corner of the project grid.
- Going to the task settings and choosing the “Time log” field.
Note that it is logically to enter log values after you have completed a task.
Either working in the column or in the settings, you will see a window where you can enter hours, minutes, dates, and even leave necessary comments.
There, you will find two tabs: Time log itself and History where you can track who logs the time and how much, dates, and comments. Also, this is where you can edit or delete records and see the total time spent on this particular task.
Personal time log
To find all personal tasks you have logged time for, click on the “My time log” button on the left dashboard. There, you will find a customizable table with the following columns that can be sorted:
- Task name.
- Project.
- Date.
- Time.
- Comment.
Here, you can edit only Date, Time, and Comment columns.
Personal time log also allows:
- Keeping track of the total time spent.
- Seeing the time range.
- Working with filters.
- Exporting it in one click to Excel.
- Grouping by Task name, Project, Date, and Time.
What tasks can be logged?
You can log subtasks and milestones. As usual, parent tasks include the sum of all the subtasks, the whole project is made up of parent tasks.
Who can change log time?
Owners can change log time in every project. Admins can change log time in own projects and in those projects where they are admins. Members can only work with their tasks.
See the whole picture with reports
From now on, Owners and Admins have access to reports. Find the “Reports” button in the lower part of the left dashboard.
At the moment, they can create Time log reports by people from their teams.
In other words, it is the same menu as My time log. The only difference is that it shows the time log by every team member. With that said, there is one additional option in the “Group by” menu and one more additional column called User. All the rest is the same as in the “My time log” menu.
By the way, you can export these reports even with the applied filters and with the grouped data.
Create and work with Google Drive documents directly in GanttPRO
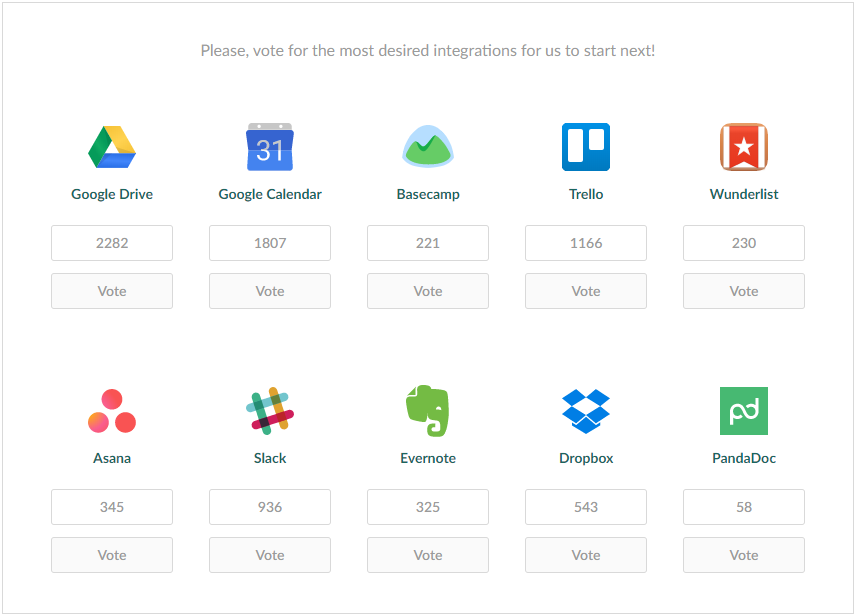
For months, we have been conducting the poll on which integration our users would like to see next. Google Drive was the most voted one.

Finally, we are happy to announce it: GanttPRO integrates with Google Drive!
How does GanttPRO and Google Drive integration work?
Previously, you could choose files from your computer or leave direct Google Drive links in task settings. From now on, your work with file attachments will be easier.
After clicking on the “Attach from Google Drive” button in the “Task attachment” section, you will see the following options:
- Choose file. The menu allows connecting to the root folder of your Google Drive account and attaching files from it to this task.
- Create new file. The menu allows creating a new Document, Spreadsheet, Drawing, and Presentation right inside GanttPRO. Note that a newly created document will get the name of the task it is attached to.
- Change default folder.
- Change account.
The integration is built upon the official Google Drive API. GanttPRO has been verified and qualified for being a Google vendor.
Get the enjoyable advanced filter calendar
We improved date fields in filters. Wherever you’d like to choose dates in GanttPRO, you will have a date picker with preset range dates.
Preset dates include:
- Today.
- Yesterday.
- This week.
- Last week.
- This month.
- Last month.
The most enjoyable moment about preset dates is that once you choose it, it will always be active for the specified period.
For example: this week will ALWAYS be this week, today will ALWAYS be today, etc.
Work faster with the advanced date formats
We call them “Human-friendly” dates.
Directly from the project grid and task settings, you can manage values in the Duration, Estimation, and Time log columns and fields correspondingly and set specific time units.
We introduce the following units that you can put in columns and in task settings in the corresponding fields:
- m – minutes.
- h – hours.
- d – days.
- w – weeks.
- M – months.
What does it mean?
You can directly enter values with these numbers.
For example: if you need to set 55 minutes in the Estimation column, enter 55m.
If you need to set 1 week in the Estimation column, enter 1w and it will automatically convert it to 40h. Why? By default, firstly, the week is set with 5 working days and 8 hours each. Secondly, the Estimation column is set in hours so all the entered values will be converted into hours.
The Duration column is connected to the duration step. So, all your entered values here will be converted to this time unit. For example, 1w converts to 5d if a duration step is set in days.
Note that minutes as time units are possible for the Estimation and Time log columns. The Duration column can’t be set less than in hours.
Summary
This release is really impressive. We do hope that it will improve your project management.

Any questions left? We will gladly help you!
Email us at [email protected], book a personal GanttPRO demo, ask in the Live chat or leave a comment below.
